How to Refinish a Dresser
Project Overview
How to refinish a dresser that's seen better days. This guide keeps it real with easy steps and zero pressure to be the next furniture-flipping star.
Thetravel-themed nurseryis finally getting some love, and I'm finally able to share this tutorial on how to refinish a dresser.
Now that I'm settled into the new house, I can finally focus on the fun stuff, like furniture flips and DIY projects that don't involve moving tape.
This dresser makeover was simple, satisfying, and definitely more budget-friendly than buying a new one.
If you've got an old piece just sitting there, this is an easy way to make it look like you totally meant to keep it.
The paint brand I used is sadly no longer available. It was called Maison Blanche. You can still find it on Etsy and a few other places, but it hasn't been available for a while, so even if you do find it, I wouldn't recommend using it.
However, I can recommend using Dixie Belle Mineral Paint. There are so many colors to choose from, and the paint is so smooth!
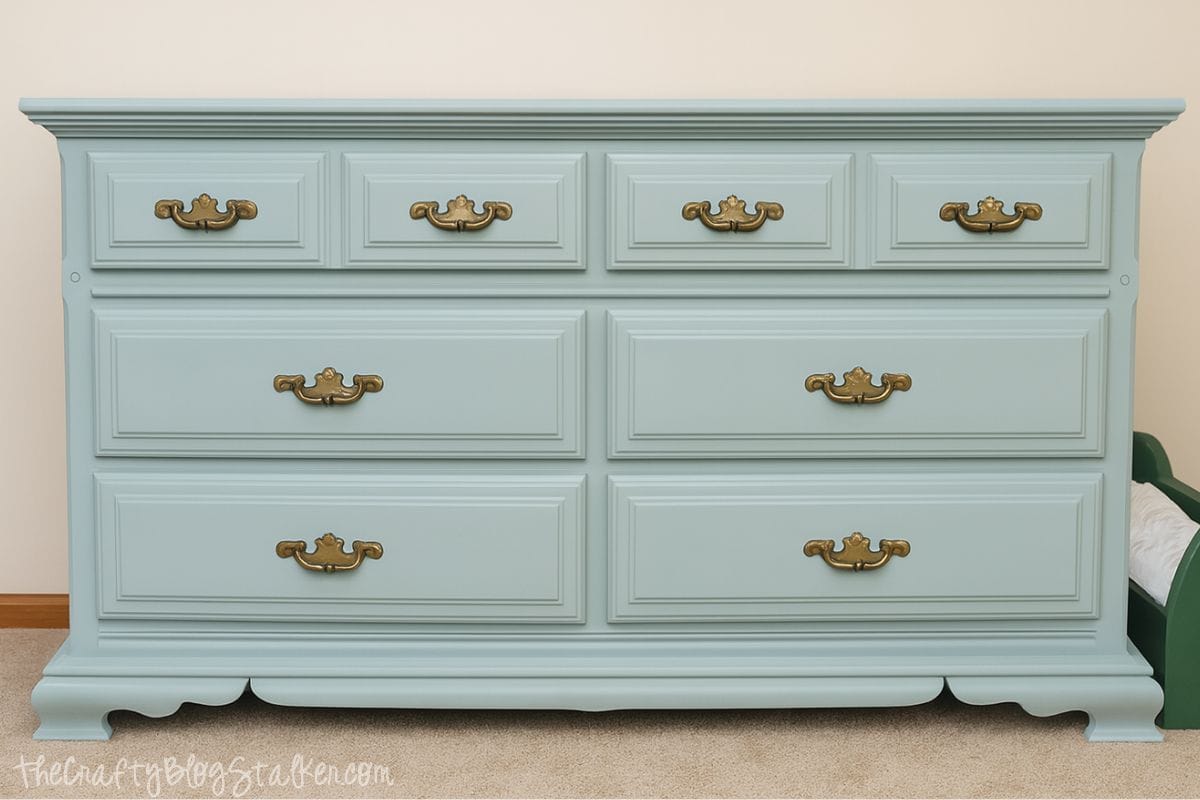
The closest color to what I used is probablySea Glass. It is a shade of mint, but also has a hint of blue.
Since I started this project at my previous house, had a baby, and then moved, I am missing a few pictures, but the overall process is pretty simple. I promise!
Here is a picture of the dresser before I began.
PLEASE PLEASE PLEASEtest this in a small area if you are unsure of the results.
This is the only piece of furniture I've tried this on, and while I love the look, you may not.
It will also depend on the color of paint you are using as the base color. So again,PLEASE test it. I am not responsible for you ruining a piece of furniture.
Begin by giving the dresser a good clean with a damp cloth.
While you're at it, you might as well clean everything, even if it won't get painted. The corners of old dresser drawers can get nasty!
Let the furniture dry completely before painting.
Use a screwdriver to remove any necessary hardware and tape off areas as needed.
Apply a light coat ofBIN Shellac-Based Primer. This primer is a bit more expensive, but it's a high-quality primer that dries extremely fast.
Lightly sand the surface with 220-grit sandpaper to smooth the finish before painting.
Ensure the paint is thoroughly mixed by either shaking the container or stirring with apaint stir stick.
It doesn't really matter what kind of paintbrush you use. You can find nice furniture paintbrushes, or just use the same one you used last year topaint your front door.
Apply a very thin coat of mineral paint.
You could do one really thick coat and be done with it, but I think the overall finish ends up better if you start with a thin coat.
Let that dry. Usually, by the time I'm finished painting, I can go back to where I started and apply a second coat, unless it's a tiny project.
It dries really fast, though. You shouldn't have to wait too long.
Take a dry cloth and wipe it down to remove any dust or excess paint (it has a very chalky feel at this point).
Some people sand, but I find it comes out very smooth by just brushing it off with a cloth.
If you want an excellent finish, you might consider sanding with a very fine grit paper, but I was aiming for a vintage look, so perfection wasn't necessary.
Apply a final third coat. This layer can be brushed on a bit thicker than the first, but not so much that it drips.
Let that dry completely. My plan was to let it dry overnight, but then I had the baby, so it dried for a bit longer. ÄŸËâ?/p>
Now it's time to seal it. I chose to use polyurethane. We'll discuss why I chose this option below.
Follow the product instructions when sealing your furniture to get the best outcome.
I simply rubbed on my poly, even though I didn'tbuy the wipe-on poly, I usedMinwaxFast-Drying Clear Satin, andhave a better description of how I did it below.
Allow the furniture to cure completely and then reinstall the hardware.
I had a definite look in mind for the finish of this dresser.
I wanted a vintage look, but didn't want to distress it. I wanted it to look clean and like I had bought it that way, but at the same time, as if I had bought it a really long time ago.
The nursery has a travel-themed, vintage look, so I wanted it to appear as if it had traveled the world in a very safe place. Does that make sense? That's just how my crazy brain works, I suppose.
I wanted the furniture to have a varnish on it, but at the same time, an old piece shouldn't have a glossy finish, right?
To achieve the look I had in mind,I simply wipedMinwax Fast Drying Clear Satinonto the dresser.
I used a cloth diaper, similar to the ones used for dusting, but you can use any lint-free cloth. An old white t-shirt would also work well.
I rubbed in long, smooth motions, following the grain of the wood.
Typically, you sand between each layer of poly, but I skipped that step because I wanted it to look like it had been worn. I tried my best to achieve an even cover, but the lack of sanding will leave it with a streaky finish (which is desirable when aiming for a vintage look).
I let this dry following the instructions on the can.
Then I applied a second coat to ensure it was thoroughly sealed. After I applied the second coat, I took a dry part of the diaper and rubbed it vigorously over the entire dresser.
You can't just slap it on there. You must apply it as evenly as possible in long motions, especially on large, flat surfaces. The streaking comes naturally... no need to streak it yourself!
So that's it. Now you have a piece that looks vintage but has been well-maintained. That might only make sense to me, but I LOVE how it turned out! 🤪
Typically, a polyacrylic finish is used when refinishing painted furniture, as polyurethane can yellow with age.
I wasn't too worried about that since my furniture isn't painted white, and I actually wanted the yellowing to happen.
This is why I didn't brush it on, but instead rubbed or wiped it on.
There isn't a real thick coat of the poly, so the yellowing won't be drastic. Yay for looking old!
It's been a few weeks with the poly on the dresser, and it has started to yellow. It is perfect.
It looks like an old piece of furniture you would find at an estate sale! Sometimes, doing something the "wrong" way will give you great results! ÄŸËâ?/p>
Let's create a nursery that is both calming and inviting. Here are a few DIY ideas!
Hi, I'm Katie!
I'm so glad you're here. Want to make something fabulous? I'm here to help!
Materials Needed
- Colored cardstock or patterned paper
- Craft scissors or paper cutter
- Double-sided tape or glue stick
- Ruler and pencil
- Decorative elements (ribbons, stickers, washi tape)
- Cutting mat
- Scoring tool or bone folder
- Embellishments (buttons, sequins, stamps)
Step-by-Step Instructions
Prepare Your Materials
Gather all the required materials and tools. Make sure you have everything listed in the materials section before starting.
Set Up Your Workspace
Find a clean, well-lit area to work. Cover your surface with newspaper or a craft mat to protect it.
Follow the Main Steps
Carefully follow the instructions step by step. Take your time and don't rush through any part of the process.
Add Personal Touches
Once you've completed the basic project, feel free to add your own creative touches and personalization.
Final Assembly
Put all the pieces together according to the instructions. Double-check that everything is secure and properly attached.
Pro Tips
💡 Tip: Take your time and enjoy the creative process
💡 Tip: Don't be afraid to experiment with different colors or materials
💡 Tip: If you make a mistake, don't worry - it's all part of learning
💡 Tip: Share your finished project with friends and family
💡 Tip: Take photos of your progress to document your crafting journey
You Might Also Like


References & Further Reading
Explore these trusted resources to deepen your crafting knowledge and find more inspiration for your next project.
- Do It Yourself — Wikipedia Overview of DIY culture, history, and common techniques across woodworking, home improvement, and crafting.
- Handicraft — Wikipedia Background on traditional handicrafts, materials, and the cultural significance of handmade goods.
- Instructables Community-driven DIY project library with step-by-step photos, videos, and printable instructions.
- Woodworking — Wikipedia Techniques, tools, joinery methods, and the history of working with wood as a craft.
- Sewing — Wikipedia History and modern practice of sewing, including stitches, equipment, and fabric choices.
- Bob Vila Trusted home improvement, tool reviews, and illustrated how-to guides from a household name.
- Papercraft — Wikipedia Art forms that use paper as the primary medium, from origami to paper-mache.
- Michaels — Project Ideas Project walkthroughs, material lists, and weekly craft ideas from a major arts & crafts retailer.