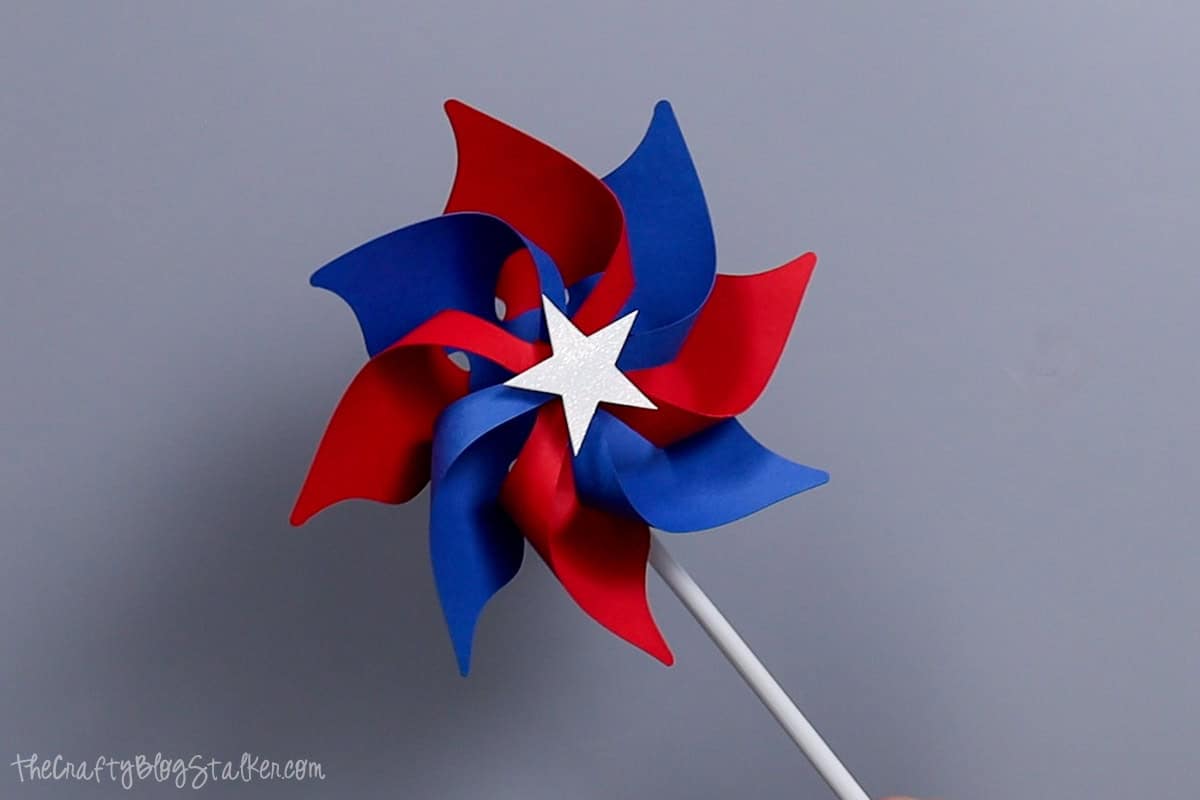
Paper Pinwheels with Free SVG Cut File
Project Overview
Don't miss out on these fun DIY red, white, and blue paper pinwheels! Use our free SVG cut file to add a patriotic flair to your summer decor.
Looking to add a patriotic flair to your summer decor?
These DIY red, white, and blue paper pinwheels really spin and are perfect for celebrating with kids or decorating your home!
Crafting these fun and festive pinwheels is a breeze with our free SVG cut file,
Learn how to create your own personalized pinwheels for your summer celebrations.
If videos are your thing, you're in luck-I've got a full tutorial ready for you!
Subscribe to my YouTube channeland stay inspired with every new project.
Some supplies were gifted at no cost. When exact item are unavailable online, links may point to comparable products.
This digital media is forPersonal Use Only- You do not have permission to redistribute.
For the following steps, I'll be using Cricut Design Space.
If you use Silhouette Studio or a different design software, your steps may be different than mine.
To start, upload the SVG into Cricut Design Space and add it to your Canvas.
The file is ready to cut as is, but I will make a few changes to customize the file.
The first thing I need to do is Ungroup the cuts.
Highlight the entire design and select the Ungroup icon.
I also want to cut this out of three colors instead of one.
To change the color, highlight the piece and select the color under Operation.
Now all of the pieces are the color that I want them.
Select Make, and the next screen is the Mat Preview.
I am making 4 pinwheels, and I can easily select how many project copies I want in the drop-down section. Then click Apply.
The file is sized so that 4 pinwheel pieces can be cut on one 12x12 sheet of cardstock.
Click Continue.
Select the Material, I am using 80lb cardstock.
When cutting paper, I always select More Pressure to get a nice, clean cut.
The prompts in Cricut Design Space will tell you what color to load into your machine to cut.
To apply the piece of paper to the mat, start in a corner, align the edges from that corner, and press the paper onto the mat.
Load the mat into the machine and cut!
Here are all of the pieces needed to make one paper pinwheel.
We are going to start by assembling the paper pieces.
Use a bone folder to give a curve to all of the flag parts on the cut paper pieces.
This is what the two pieces look like after those ends have curled.
It doesn't matter which piece is the bottom, or the top, so just pick one for the bottom and add a few glue dots near the center hole.
Place the second piece on top, keeping those center holes together, and the flags of the top pieces between the flags on the bottom piece.
This is what it should look like.
For the next step, I am using several glue dots. Mine are a little bigger than I need, so I cut them in half.
Grab an end with a hole, it can be any end, and adhere a small glue dot underneath the hole.
Going clockwise, grab the next end, it will be a different color than the first, line up the holes, and press together.
Add another glue dot below the hole, and adhere the next piece, it will be the same color as the first.
Repeat, going around the pinwheel until all the hole pieces have been aligned and glued together.
The stick is the magic part of this pinwheel, and is how it can spin!
There are five parts to the stick.
Start with the nail piece, and slide on the top hat so the two flat ends come together.
Push the nail through the front of the pinwheel so a post is sticking out the backside.
Place the washer over the post.
Then press the T piece onto the post. It helps to press it down onto a table and press until you hear the pieces click together.
Insert the stick into the plastic T, and we are nearly done.
The last step is to add the center star.
Place a glue dot on the front flat plastic piece.
Then adhere the star to the front.
Then lightly blow on the pinwheel and watch as it spins!
If the pinwheel doesn't spin freely and is getting caught on a paper piece, slightly bend the paper until it will spin freely.
I also noticed that all of my pinwheels are a little different on where that air needs to be aimed to spin, so just play with it until you find that perfect spot.
While this project is perfect for July 4th, it could easily be customized for any summer party! Simply change out the star on the front for a different shape and you have a whole new themed pinwheel!
Materials Needed
- Colored cardstock or patterned paper
- Craft scissors or paper cutter
- Double-sided tape or glue stick
- Ruler and pencil
- Decorative elements (ribbons, stickers, washi tape)
- Cutting mat
- Scoring tool or bone folder
- Embellishments (buttons, sequins, stamps)
Step-by-Step Instructions
Prepare Your Materials
Gather all the required materials and tools. Make sure you have everything listed in the materials section before starting.
Set Up Your Workspace
Find a clean, well-lit area to work. Cover your surface with newspaper or a craft mat to protect it.
Follow the Main Steps
Carefully follow the instructions step by step. Take your time and don't rush through any part of the process.
Add Personal Touches
Once you've completed the basic project, feel free to add your own creative touches and personalization.
Final Assembly
Put all the pieces together according to the instructions. Double-check that everything is secure and properly attached.
Pro Tips
💡 Tip: Take your time and enjoy the creative process
💡 Tip: Don't be afraid to experiment with different colors or materials
💡 Tip: If you make a mistake, don't worry - it's all part of learning
💡 Tip: Share your finished project with friends and family
💡 Tip: Take photos of your progress to document your crafting journey
You Might Also Like

References & Further Reading
Explore these trusted resources to deepen your crafting knowledge and find more inspiration for your next project.
- Do It Yourself — Wikipedia Overview of DIY culture, history, and common techniques across woodworking, home improvement, and crafting.
- Handicraft — Wikipedia Background on traditional handicrafts, materials, and the cultural significance of handmade goods.
- Instructables Community-driven DIY project library with step-by-step photos, videos, and printable instructions.
- Woodworking — Wikipedia Techniques, tools, joinery methods, and the history of working with wood as a craft.
- Sewing — Wikipedia History and modern practice of sewing, including stitches, equipment, and fabric choices.
- Bob Vila Trusted home improvement, tool reviews, and illustrated how-to guides from a household name.
- Papercraft — Wikipedia Art forms that use paper as the primary medium, from origami to paper-mache.
- Michaels — Project Ideas Project walkthroughs, material lists, and weekly craft ideas from a major arts & crafts retailer.