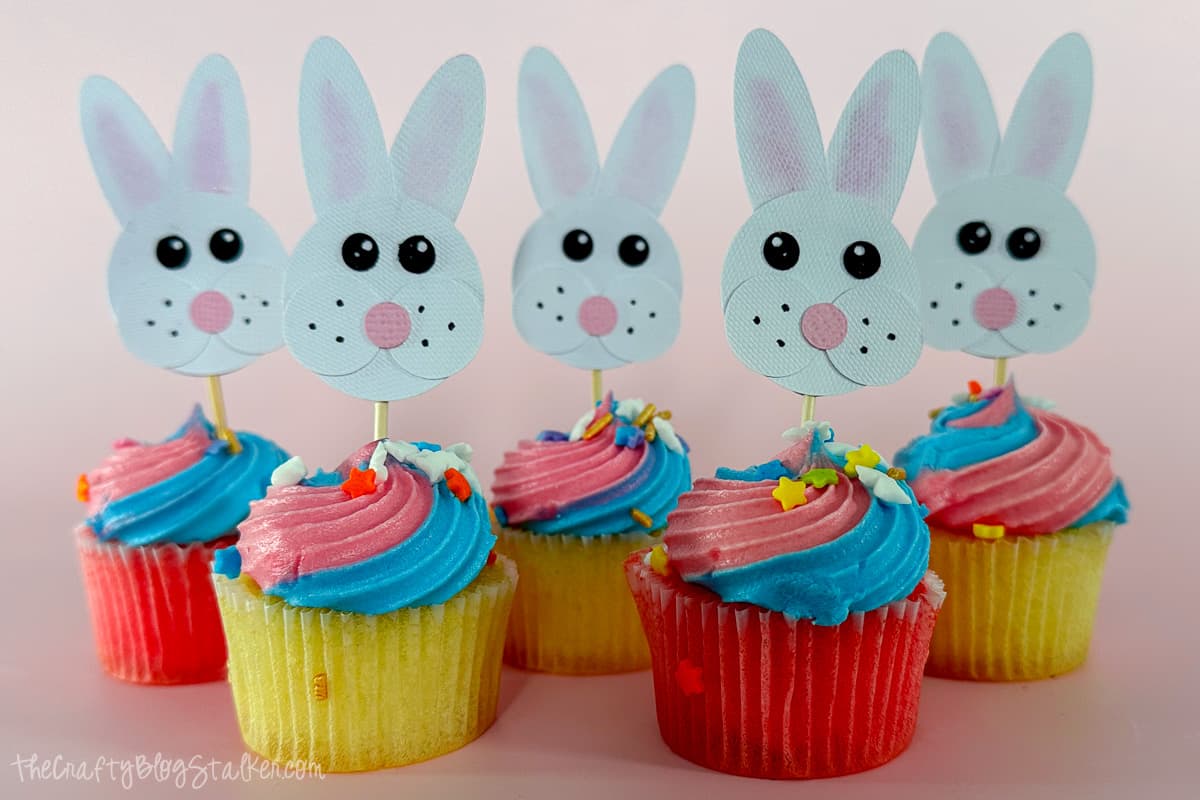
Easter Bunny Cupcake Toppers with Free SVG
Project Overview
Craft delightful Easter Bunny cupcake toppers with our step-by-step tutorial and free SVG file. Add a festive touch to yourspring treats!
Welcome to our Easter Bunny cupcake topper tutorial!
These charming toppers are guaranteed to bring joy, whether you are hosting an Easter event or just looking to add a festive touch to your treats.
Follow along with our step-by-step instructions and free SVG file to create charming toppers that will elevate your cupcakes to a whole new level.
Let's get crafting and make this Easter celebration extra special!
If videos are your thing, you're in luck-I've got a full tutorial ready for you!
Subscribe to my YouTube channeland stay inspired with every new project.
Some supplies were gifted at no cost. When exact item are unavailable online, links may point to comparable products.
This digital media is forPersonal Use Only- You cannot redistribute.
For the following steps, I'll be using Cricut Design Space.
If you use Silhouette Studio or a different design software, your steps may be different than mine.
To start, upload the SVG into Cricut Design Space and add it to your Canvas.
The design measures 3.6 x 2.22 inches and is ideal for standard-sized cupcakes.
Since I'm using mini cupcakes, I'll adjust the design to make the toppers fit better.
Highlight the entire design, and under edit change the width to 1.4 inches, this makes the entire design 1.4 x 2.27 inches.
Click on Make It, and the next screen is your Mat Preview.
You can also adjust how many copies you want to cut on this page. I typed 12 so all my cupcakes could have a cute bunny topper.
The 12 copies are then reflected on the mat previews.
Close the Mats screen, and click Next.
Select Medium Cardstock as the material, and when cutting paper, I always select More under pressure and then Remember Material Settings.
If you don't toggle to Remember Material Settings, you will return to this screen between every mat, and since all mats are the same material, there is no need to do that.
Remove the protective sheet from the StandardGrip Mat.
I can see from the image above that our first mat color is black, so I will apply the black cardstock to the mat first.
Align the paper to the mat using a corner to keep everything straight.
Load the black mat into the Cricut and begin the cut.
When the cut is finished, unload the mat.
To remove the cut pieces from the mat, turn the mat over, and roll the mat back to remove the paper pieces.
If any cut pieces stick to the mat, turn the mat facing up, and carefully push the cut pieces off with the spatula tool.
Follow the prompts in Cricut Design Space. It will let you know what color of cardstock to load next until all of your mats are cut.
To add more color to the white bunnies, add some pink to the inside of the ears with chalk.
Pick up some pink chalk with a cotton swab and color the inside of the eat with the cotton swab.
If there is any chalk residue after coloring the ears, just blow it off.
The bunny ears are the only place I am adding chalk, but I have added gray chalk around all the pieces before.
This adds just a little bit more definition between layers. That is totally up to you, and it looks cute both ways.
Let's start assembling the pieces! A fine precision tip glue is great for attaching these small pieces together.
Arrange the bunny ears, with one ear just slightly overlapping the other.
Apply a thin line of glue along the bottom of the ears.
Take a large circle and adhere it to the ears.
Draw a straight line of glue about two-thirds down the circle.
Grab two smaller circles and carefully position them side by side, right on top of that line of glue.
Place a dot of glue on the back of the pink nose, and place it between the bunny cheeks.
The black eyes are small, so I used a pair of tweezers to help hold them.
Add glue to the back of the eyes and place them on the bunny face.
To complete the adorable bunny face, I used an Ultra Fine Black Sharpie marker to add a few whisker dots.
Isn't that bunny face so cute!?
Flip the bunny face upside down, then carefully apply a thick line of glue, straight down near the bottom.
Press the top of a toothpick into the glue and let it dry before you move it.
Once the glue securing the toothpick is dry, apply more glue all over the back.
Place a second large circle over the back to secure the toothpick and give the cupcake topper a nice finish.
There is our finished bunny cupcake topper! It's so cute!
Simply stick the toothpick into a mini cupcake and your party is ready to go!!
These fun Easter treats are perfect for Easter, but would also be great for baby showers, or a spring birthday party.
Here are some other Easter cupcakes I made, this time using googley eyes, and outlining each piece with gray chalk.
Which ones are your favorite?
Visit the website for step-by-step directions. All links will open in the same tab.
Craft a charming centerpiece with our free SVG laser file! Learn how to make a double-sided wooden bunny for your holiday table decor.
Add charm to your Spring decor with a 3D Paper Art Bunny! Follow our Cricut tutorial for this adorable Easter craft project.
Welcome spring with a DIY door hanger! Get started with our Free SVG file. Easy crafting for a cheerful front door makeover!
Unleash your Easter creativity with 27 fun crafts! Follow step-by-step instructions to make decorations and gifts.
Materials Needed
- Colored cardstock or patterned paper
- Craft scissors or paper cutter
- Double-sided tape or glue stick
- Ruler and pencil
- Decorative elements (ribbons, stickers, washi tape)
- Cutting mat
- Scoring tool or bone folder
- Embellishments (buttons, sequins, stamps)
Step-by-Step Instructions
Prepare Your Materials
Gather all the required materials and tools. Make sure you have everything listed in the materials section before starting.
Set Up Your Workspace
Find a clean, well-lit area to work. Cover your surface with newspaper or a craft mat to protect it.
Follow the Main Steps
Carefully follow the instructions step by step. Take your time and don't rush through any part of the process.
Add Personal Touches
Once you've completed the basic project, feel free to add your own creative touches and personalization.
Final Assembly
Put all the pieces together according to the instructions. Double-check that everything is secure and properly attached.
Pro Tips
💡 Tip: Take your time and enjoy the creative process
💡 Tip: Don't be afraid to experiment with different colors or materials
💡 Tip: If you make a mistake, don't worry - it's all part of learning
💡 Tip: Share your finished project with friends and family
💡 Tip: Take photos of your progress to document your crafting journey
You Might Also Like
References & Further Reading
Explore these trusted resources to deepen your crafting knowledge and find more inspiration for your next project.
- Do It Yourself — Wikipedia Overview of DIY culture, history, and common techniques across woodworking, home improvement, and crafting.
- Handicraft — Wikipedia Background on traditional handicrafts, materials, and the cultural significance of handmade goods.
- Instructables Community-driven DIY project library with step-by-step photos, videos, and printable instructions.
- Woodworking — Wikipedia Techniques, tools, joinery methods, and the history of working with wood as a craft.
- Sewing — Wikipedia History and modern practice of sewing, including stitches, equipment, and fabric choices.
- Bob Vila Trusted home improvement, tool reviews, and illustrated how-to guides from a household name.
- Papercraft — Wikipedia Art forms that use paper as the primary medium, from origami to paper-mache.
- Michaels — Project Ideas Project walkthroughs, material lists, and weekly craft ideas from a major arts & crafts retailer.