How to Recreate Art with Cricut
Project Overview
Unlock your inner artist with Cricut! From personalized home decor to custom gifts, discover how easy it is to create stunning, pieces of art for your home.
Ever thought about turning your creative ideas into stunning art pieces?
With Cricut machines, the possibilities are endless!
From personalized home decor to custom gifts, you'll be amazed at how easy and fun it is to recreate art with Cricut.
If videos are your thing, you're in luck-I've got a full tutorial ready for you!
Subscribe to my YouTube channeland stay inspired with every new project.
Some supplies were gifted at no cost. When exact item are unavailable online, links may point to comparable products.
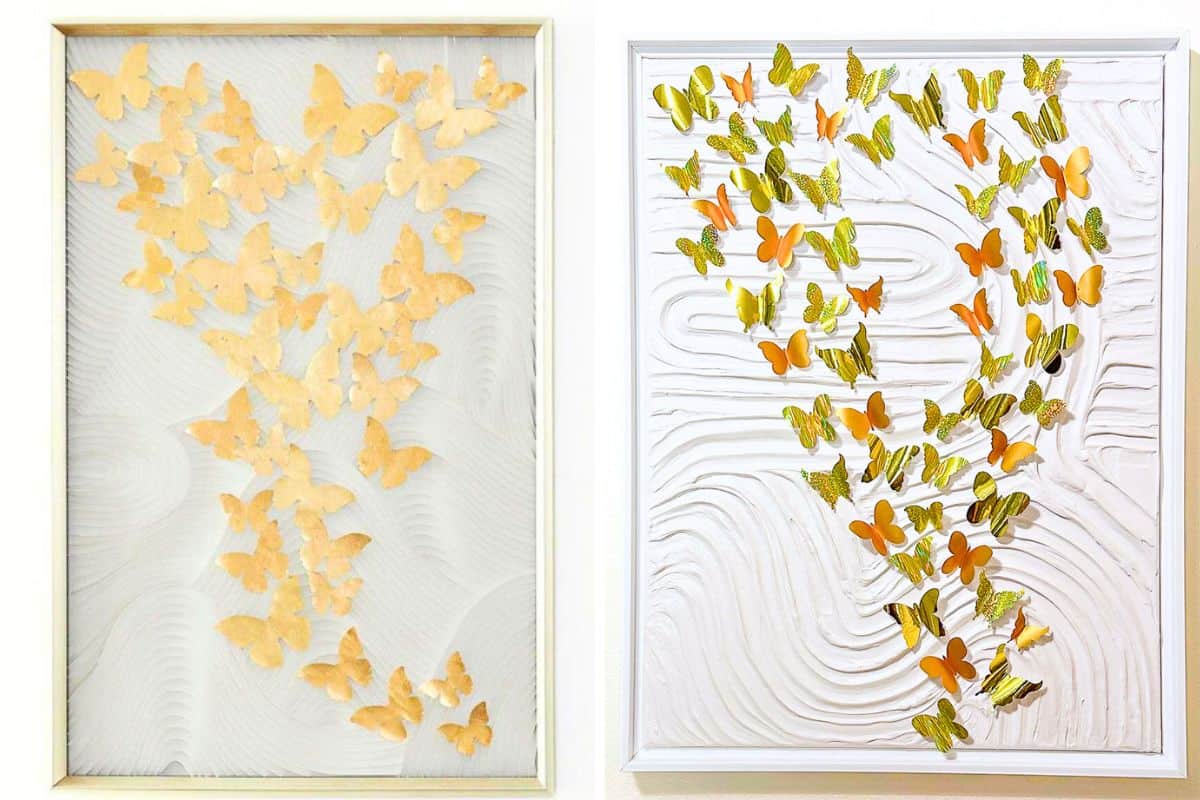
The project that I am recreating is a piece from the John-Richard Collection called Wings of Gold.
This is a beautiful piece with a waving texture and beautiful gold butterflies.
I like this piece, but I thought a replica could be made using a few supplies and my Cricut!
I will start with the textured part of the canvas first because it takes a couple of days to dry completely.
Grab a bucket of joint compound. The brand I used was USG Sheetrock, but I am not sure if it really matters the brand.
Make sure to put on some latex gloves because this is going to get a little bit messy.
Stir the top bit of compound in the bucket to remove any air bubbles and make the compound nice and smooth.
Scoop a large amount of the compound onto the canvas. It does take quite a bit, and don't worry you can remove any excess later.
Spread the compound evenly on the canvas, and the compound should be at least .25 inch thick.
There are two ways to add texture to the compound. First is with art tools that have grooves. These I found at my local dollar tree.
The tools are fun to play with and create nice even lines.
The great part about this type of texture art is that it is easy to test and play with the different tools to see what look you like best. Just smooth out the compound again and restart.
The other way is to use fingers. I like this method, it is less perfect but that is what I like about it.
I started with a simple stroke using four gloved fingers and then built on the design from there.
Once the texture art is finished, go around the edges with a flat scraper tool to clean them up and remove excess compound.
Let the canvas dry completely. It may take 24 to 48 hours depending on the thickness of the compound.
As it dries the compound turns a white chalky color.
Small cracks are normal as it dries, but if you don't like them, you can go over them with some compound on a small paintbrush to fill them in.
I was hoping to find a gold cardstock that was super shiny but wasn't a thick posterboard, and I couldn't find any.
The Gold Holographic Vinyl is exactly what I was looking for, but it is adhesive vinyl, not paper.
So I decided to make my own cardstock using the gold holographic vinyl.
I chose 4 different sheets from the sample pack and cut each sheet in half. I'd only need a 6x12 sheet for each variation.
I used white construction paper as my paper base because I wanted to keep my butterflies light.
Instead of a scraper tool use a soft cloth. A scraper tool will scratch the holographic vinyl and I don't want that, so I will keep my cloth close by.
Peel back the first couple of inches of backing paper from the gold vinyl and fold it down.
Align the gold vinyl to the white construction paper starting in the corner.
Press the edge of the vinyl onto the paper using that soft cloth.
Then pull on that folded-over tab of backing paper, and press with the cloth, at the same time, to completely adhere the vinyl to the paper.
Now I have a sheet of gold holographic cardstock!
Trim off any excess paper off the bottom of the sheet.
Don't worry about trimming around the edges, the Cricut will cut the butterflies from the center of the sheet, not the edges, so they won't matter.
Repeat to convert the other 6x12-inch sheets of vinyl to cardstock.
This project is available inCricut Design Space, if you want to use it.
I used my Cricut Maker to cut out the butterflies but this project will also work with any Cricut machine.
There are 4 different butterflies in each row, the different colors are to signify the different mats for the gold cardstocks I created.
There is no need to make changes, just click Make.
The next page is the Mat Preview where I can scroll through the different mats.
Before I cut, I changed the project copies to 4.
Each mat is now showing 16 butterflies instead of 4.
There is no option to select a material size of 6x12 on the mat, so I checked that all the butterflies are above that 6-inch mark on the mats.
For any butterflies below the 6-inch mark, I move them to a different mat, and if they still don't fit I just delete them.
When all of the butterflies are situated, click Next.
The material type I chose, is foil poster board. I had to search the materials list, but it was in there.
I also selected more pressure for my blade, I always do that when cutting paper for a better cut.
Lay a piece of the handmade gold cardstock onto a StandardGrip cutting mat, and load the mat into the machine.
When the play light blinks, click it to start the cut.
When finished cutting remove the mat from the machine with the unload button.
Turn the mat over so the back side of the mat is facing up, and peel that mat away from the cut butterflies.
Repeat, loading the other 3 sheets to cut in the Cricut.
Once all the butterflies have been cut, it is time to shape them with a bone folder!
Fold each butterfly in half, and press on the crease with a bone folder.
Then take each wing and carefully run it between the bone folder and your thumb to shape them.
When the joint compound on the canvas is completely dry, it is time to sand and paint.
I used 180 grit sandpaper and sanded the entire canvas smoothing out any pointy peaks.
Don't forget to go around those edges and clean those up as well.
Remove dust by blowing it away or wiping the art with a damp cloth.
For the first 2 coats of paint, I used white acrylic paint.
I applied the paint following the grooves of the texture, making sure to get all of the nooks and crannies.
I let each coat dry for about 30 minutes before applying the next coat.
My canvas took two coats of white paint, and it covered really well.
For the final coat, I used a Pearl White, painted the same way I had before, and let it dry.
I love the pearl paint because it still looks wet even when it has dried!
Before gluing the butterflies down it is a good idea to arrange them first to make sure you like the placement.
I like how they are placed so I grab my hot glue gun to glue them in place.
Fold the butterfly and apply a line of hot glue along the fold.
Then press the butterfly into position on the canvas.
Don't blow a hair off the canvas before the butterflies have been glued down. I may have done this. 🤣
It was easily fixed and the butterflies were rearranged, just not in the same position.
When I thought all of the butterflies had been glued down, I lifted the canvas and did a little side shake to see if any fell off, but they were all strongly attached so I had nothing to worry about.
It is so cute!
The piece of art is finished, but if I wanted to add a final touch it would be framing the canvas.
The floating canvas frame finished the piece and made it look more professional.
I love my finished piece of art and it looks fabulous hanging in my office. I made that!
Materials Needed
- Colored cardstock or patterned paper
- Craft scissors or paper cutter
- Double-sided tape or glue stick
- Ruler and pencil
- Decorative elements (ribbons, stickers, washi tape)
- Cutting mat
- Scoring tool or bone folder
- Embellishments (buttons, sequins, stamps)
Step-by-Step Instructions
Prepare Your Materials
Gather all the required materials and tools. Make sure you have everything listed in the materials section before starting.
Set Up Your Workspace
Find a clean, well-lit area to work. Cover your surface with newspaper or a craft mat to protect it.
Follow the Main Steps
Carefully follow the instructions step by step. Take your time and don't rush through any part of the process.
Add Personal Touches
Once you've completed the basic project, feel free to add your own creative touches and personalization.
Final Assembly
Put all the pieces together according to the instructions. Double-check that everything is secure and properly attached.
Pro Tips
💡 Tip: Take your time and enjoy the creative process
💡 Tip: Don't be afraid to experiment with different colors or materials
💡 Tip: If you make a mistake, don't worry - it's all part of learning
💡 Tip: Share your finished project with friends and family
💡 Tip: Take photos of your progress to document your crafting journey
You Might Also Like
References & Further Reading
Explore these trusted resources to deepen your crafting knowledge and find more inspiration for your next project.
- Do It Yourself — Wikipedia Overview of DIY culture, history, and common techniques across woodworking, home improvement, and crafting.
- Handicraft — Wikipedia Background on traditional handicrafts, materials, and the cultural significance of handmade goods.
- Instructables Community-driven DIY project library with step-by-step photos, videos, and printable instructions.
- Woodworking — Wikipedia Techniques, tools, joinery methods, and the history of working with wood as a craft.
- Sewing — Wikipedia History and modern practice of sewing, including stitches, equipment, and fabric choices.
- Bob Vila Trusted home improvement, tool reviews, and illustrated how-to guides from a household name.
- Papercraft — Wikipedia Art forms that use paper as the primary medium, from origami to paper-mache.
- Michaels — Project Ideas Project walkthroughs, material lists, and weekly craft ideas from a major arts & crafts retailer.