Shaker Snowman Decor with Cricut SnapMat
Project Overview
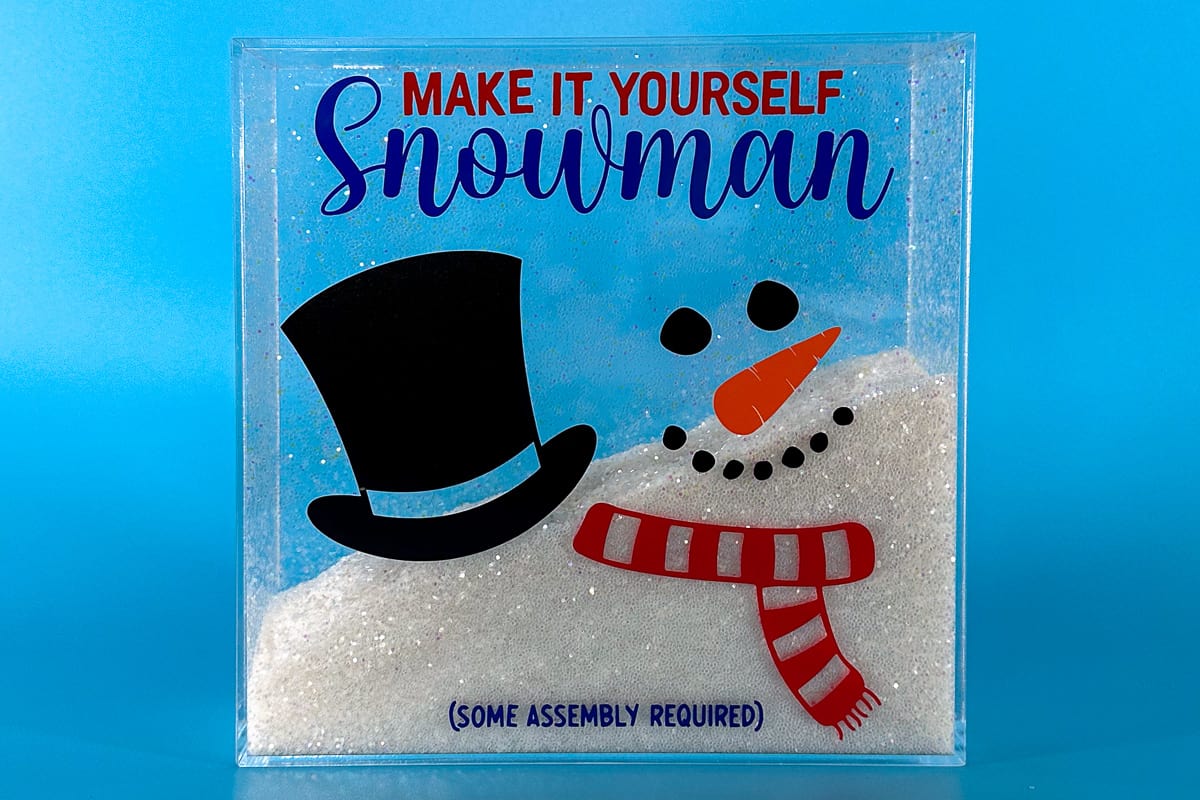
Add winter charm to your decor with this DIY Glitter Shaker Snowman made using Cricut. Plus, get your Snowman Kit Free SVG!
Add whimsy to your winter decor with this delightful Glitter Shaker Snowman project crafted with Cricut.
We'll guide you through creating this charming decoration and provide a free SVG for the Snowman Kit.
Let's add some festive magic to your home!
If videos are your thing, you're in luck-I've got a full tutorial ready for you!
Subscribe to my YouTube channeland stay inspired with every new project.
Some links may direct you to similar items when the exact item is not available online.
Ensure the acrylic frame you purchase doesn't have nail holes to hang. Glitter will spill out these holes and we don't want a glitter mess.
This digital media is forpersonal use only.You do not have permission to redistribute it.
There will be no watermarks on the downloaded version.
I use Cricut Design Space, and the next several steps will be based on that.
If you use Silhouette Studio or a different design software, your steps may differ.
The first thing to do is upload the file into your cutter software.
Size the design to fit your project.
I sized the design to 6.78 x 7 inches for my acrylic frame.
I am going to use the SnapMat feature, and this option is only available when using Cricut Design Space on a device.
I click on Make to be taken to the mat preview page, where I can see how much vinyl I will need for each layer.
Select Make It, which will take you to the Mat Preview Page.
Cut a piece of vinyl for each layer that is big enough for that cut, and arrange those pieces on your StandardGrip Mat.
In Design Space, select Cancel to go back to the canvas.
Highlight the entire design and change to one color, I chose black but the color doesn't really matter.
Select Make again to take you back to the Mat Preview page.
Select SnapMat, and this will open the camera on your device.
Using the camera, align the mat in the square on the camera.
(This step is very difficult with a tablet. It is much easier with a phone.)
SnapMat will take a picture on its own when everything is perfectly aligned.
Then, you can move the different design elements into the correct square for cutting.
Select Next, and choose your material. Since I am using scraps and a mixture of vinyl, I chose Smart Permanent Vinyl.
Then let my Cricut cut out the different vinyl colors on a single mat.
After the pieces are cut, remove them from the mat and weed.
The lid piece should be the back when looking at the acrylic frame.
We will use the same transfer tape to apply or design pieces, so make sure to cut it large enough for all pieces.
Apply the transfer tape over the weeded design and secure it in place with a scraper.
Remove the backing paper and place the piece on the front of the acrylic frame.
Rub over the top with the scraper tool, then peel back the transfer tape, leaving the vinyl adhered to the acrylic frame.
Repeat the process for the top hat, smiling snowman, scarf, and text. There is no right or wrong placement.
Place the acrylic frame on its front to fill the inside with glitter.
I used about a pound of white glitter and then added a container of iridescent glitter.
This filled my frame about half full.
The back panel fits securely on the frame, but I didn't want it to accidentally fall off and spill glitter everywhere.
I opted for Beacon 3-in-1 glue because it is very strong and dries clear.
Apply glue around all four sides of the back panel.
My back panel has a small notch to help you remove the back.
If the notch were on the bottom of the frame, it wouldn't sit flat, so when gluing the back onto the frame, I made sure the notch was on the side, not the bottom.
Place the panel on the back and press into place.
A little bit of glue will squeeze out the sides. To clean up the edges, go around the edges with an alcohol wipe.
Do not turn over immediately.
Let it sit and dry. Otherwise, glitter will be glued to the edges where the glue seeped into the inside of the frame.
After a couple of hours, I turned the frame over. It is so cute, and the glitter inside is fun to shake and move around.
This cute Christmas snowman would make great gifts, or create one to add to your holiday decor!
Materials Needed
- Colored cardstock or patterned paper
- Craft scissors or paper cutter
- Double-sided tape or glue stick
- Ruler and pencil
- Decorative elements (ribbons, stickers, washi tape)
- Cutting mat
- Scoring tool or bone folder
- Embellishments (buttons, sequins, stamps)
Step-by-Step Instructions
Prepare Your Materials
Gather all the required materials and tools. Make sure you have everything listed in the materials section before starting.
Set Up Your Workspace
Find a clean, well-lit area to work. Cover your surface with newspaper or a craft mat to protect it.
Follow the Main Steps
Carefully follow the instructions step by step. Take your time and don't rush through any part of the process.
Add Personal Touches
Once you've completed the basic project, feel free to add your own creative touches and personalization.
Final Assembly
Put all the pieces together according to the instructions. Double-check that everything is secure and properly attached.
Pro Tips
💡 Tip: Take your time and enjoy the creative process
💡 Tip: Don't be afraid to experiment with different colors or materials
💡 Tip: If you make a mistake, don't worry - it's all part of learning
💡 Tip: Share your finished project with friends and family
💡 Tip: Take photos of your progress to document your crafting journey
You Might Also Like

References & Further Reading
Explore these trusted resources to deepen your crafting knowledge and find more inspiration for your next project.
- Do It Yourself — Wikipedia Overview of DIY culture, history, and common techniques across woodworking, home improvement, and crafting.
- Handicraft — Wikipedia Background on traditional handicrafts, materials, and the cultural significance of handmade goods.
- Instructables Community-driven DIY project library with step-by-step photos, videos, and printable instructions.
- Woodworking — Wikipedia Techniques, tools, joinery methods, and the history of working with wood as a craft.
- Sewing — Wikipedia History and modern practice of sewing, including stitches, equipment, and fabric choices.
- Bob Vila Trusted home improvement, tool reviews, and illustrated how-to guides from a household name.
- Papercraft — Wikipedia Art forms that use paper as the primary medium, from origami to paper-mache.
- Michaels — Project Ideas Project walkthroughs, material lists, and weekly craft ideas from a major arts & crafts retailer.