Easy Fabric Wreath for Fall
Project Overview
Beautify your home for fall with this fun and easy fabric wreath. Learn how to make a wreath, no sewing skills required.
Hey there, it's me Sara fromTwelve On Mainand I'll be sharing the tutorial for this beautiful Rag Wreath!
I'm excited to be here once again contributing! I've been so busy working on home decor and DIY projects for fall.
I am excited to bring you one of my favorite projects today, a DIY fabric wreath for fall.
Like videos?Please subscribe to my YouTube Channelso you don't miss out on any future video tutorials!
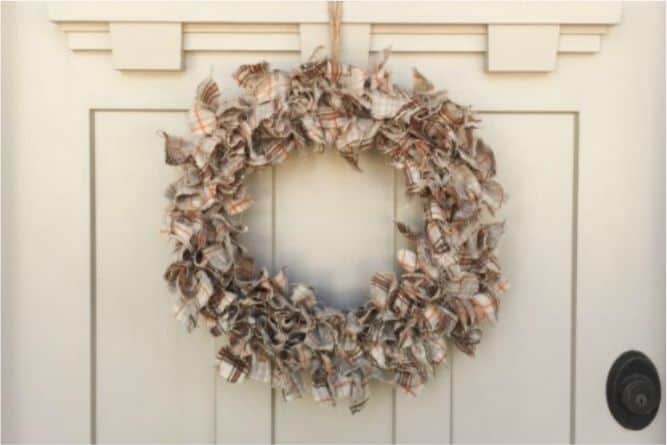
I used a 14-inch wire wreath form and you can use any size that you like.
I used a plaid fabric that I found in my fabric stash! But you can use any fabric you wish.
Rip the fabric scraps in about 1-inch wide strips and then cut the fabric strips into 5-inch lengths.
If your fabric doesn't rip easily you can cut with a rotary cutter.
Fold one piece of fabric in half, folding it under the wire wreath frame.
Then feed the two ends of the cloth through the folded end of the fabric and then pull the two ends through, pulling taut.
Repeat this over and over until the wreath is full. The more strips you add, the fuller the wreath will be.
This is preferably done while watching a little Jimmy Fallon, or perhaps some Fixer Upper. It's important to keep yourself productive!
You'll be done before he interviews his second guest, that is unless you have to have a snack while you do it, then it may take just a little longer. Either way, just enjoy yourself.
This fall wreath can easily be made for different holidays like Christmas or Spring by changing the material that you use.
No matter the season, this DIY rag wreath will make your front porch beautiful and inviting.
Materials Needed
- Fabric (cotton, linen, or specialty fabric)
- Thread (matching or contrasting colors)
- Sewing needles or sewing machine
- Fabric scissors
- Pins and pincushion
- Measuring tape
- Iron and ironing board
- Pattern or template
Step-by-Step Instructions
Prepare Your Materials
Gather all the required materials and tools. Make sure you have everything listed in the materials section before starting.
Set Up Your Workspace
Find a clean, well-lit area to work. Cover your surface with newspaper or a craft mat to protect it.
Follow the Main Steps
Carefully follow the instructions step by step. Take your time and don't rush through any part of the process.
Add Personal Touches
Once you've completed the basic project, feel free to add your own creative touches and personalization.
Final Assembly
Put all the pieces together according to the instructions. Double-check that everything is secure and properly attached.
Pro Tips
💡 Tip: Take your time and enjoy the creative process
💡 Tip: Don't be afraid to experiment with different colors or materials
💡 Tip: If you make a mistake, don't worry - it's all part of learning
💡 Tip: Share your finished project with friends and family
💡 Tip: Take photos of your progress to document your crafting journey
You Might Also Like

References & Further Reading
Explore these trusted resources to deepen your crafting knowledge and find more inspiration for your next project.
- Do It Yourself — Wikipedia Overview of DIY culture, history, and common techniques across woodworking, home improvement, and crafting.
- Handicraft — Wikipedia Background on traditional handicrafts, materials, and the cultural significance of handmade goods.
- Instructables Community-driven DIY project library with step-by-step photos, videos, and printable instructions.
- Woodworking — Wikipedia Techniques, tools, joinery methods, and the history of working with wood as a craft.
- Sewing — Wikipedia History and modern practice of sewing, including stitches, equipment, and fabric choices.
- Bob Vila Trusted home improvement, tool reviews, and illustrated how-to guides from a household name.
- Papercraft — Wikipedia Art forms that use paper as the primary medium, from origami to paper-mache.
- Michaels — Project Ideas Project walkthroughs, material lists, and weekly craft ideas from a major arts & crafts retailer.