Snowflake Wood Chargers Made from Repurposed Pallets
Project Overview
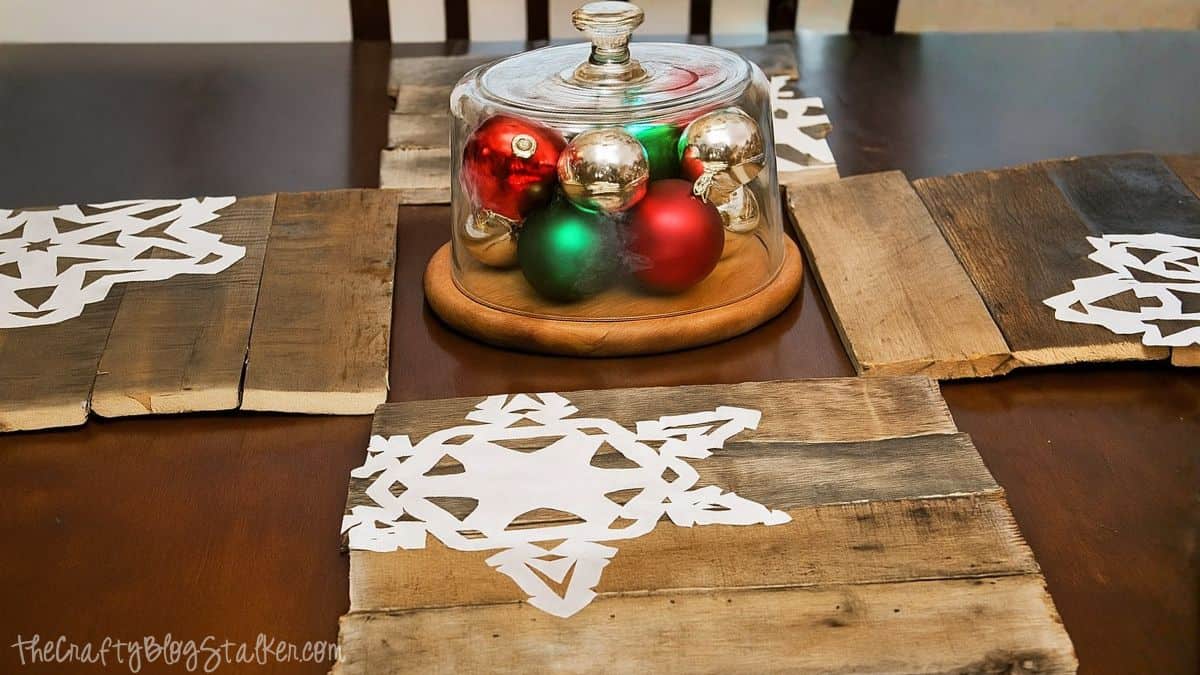
Make snowflake wood chargers from repurposed wood pallets. A simple DIY that adds rustic charm to your holiday table setting.
I've had this pallet sitting around forever, just waiting for the perfect pallet project, and I finally put it to use!
These snowflake wood chargers turned out better than I imagined and cost almost nothing to make.
They're perfect if you love rustic handmade decor and want something special for your holiday table.
Plus, it's such a fun way to decorate your table and give it a cozy, festive feel.
Start with your pallet and use a saw to cut the boards.
I cut 16 boards to make 4 chargers, each about 14 inches long.
My boards are about 3.5 inches wide, so I was able to make each charger almost perfectly square.
Apply a line of wood glue along the edge of two boards and then clamp them together.
Repeat until all boards have been glued, clamped, and dried in pairs.
Then take two pairs of boards and glue them together in the same fashion, so there are 4 boards together.
When the glue had dried and fully bonded the slabs together, you have rustic wood chargers!
While the wood pieces were drying, I cut out my snowflakes from white parchment paper.
I chose to use freezer paper because it's a duller white and thinner, so the folds won't show through after applying the Mod Podge.
I cut my freezer paper to 12" x12" and folded it in half three times.
I didn't use a template. I just eyeballed a pattern and cut with my scissors, but here are somefree snowflake patternsif you'd rather go that route.
To adhere the paper snowflake to the wood charger, I used Mod Podge.
I applied a layer of Mod Podge to the area where I wanted my snowflake to go, laid it on top, and pressed it into the glue, smoothing with my fingers.
Then I applied a layer of Mod Podge on the top, starting in the center and working my way out. Be careful around the small edges, you don't want to tear them!
After the snowflake was adhered, I applied Mod Podge to the rest of the wood to match it.
When the Mod Podge is completely dry, trim the edges of the snowflake with an X-Acto knife, then apply another coat of Mod Podge.
Let it dry completely, and you are done!
I think my favorite thing about these chargers is their versatility! I hate making crafts specific to holidays, and then that's it!
You can flip these chargers over to use year-round, and they work great for centerpieces too!
If I had a long table, I would line them up down the center as a runner, so cute!
I thought about hanging them on my wall too!! What would you do with them?
Don't put that Mod Podge away yet. Here are a few more fun ideas!
Hi, I'm Katie!
I'm so glad you're here. Want to make something fabulous? I'm here to help!
Materials Needed
- Colored cardstock or patterned paper
- Craft scissors or paper cutter
- Double-sided tape or glue stick
- Ruler and pencil
- Decorative elements (ribbons, stickers, washi tape)
- Cutting mat
- Scoring tool or bone folder
- Embellishments (buttons, sequins, stamps)
Step-by-Step Instructions
Prepare Your Materials
Gather all the required materials and tools. Make sure you have everything listed in the materials section before starting.
Set Up Your Workspace
Find a clean, well-lit area to work. Cover your surface with newspaper or a craft mat to protect it.
Follow the Main Steps
Carefully follow the instructions step by step. Take your time and don't rush through any part of the process.
Add Personal Touches
Once you've completed the basic project, feel free to add your own creative touches and personalization.
Final Assembly
Put all the pieces together according to the instructions. Double-check that everything is secure and properly attached.
Pro Tips
💡 Tip: Take your time and enjoy the creative process
💡 Tip: Don't be afraid to experiment with different colors or materials
💡 Tip: If you make a mistake, don't worry - it's all part of learning
💡 Tip: Share your finished project with friends and family
💡 Tip: Take photos of your progress to document your crafting journey
You Might Also Like

References & Further Reading
Explore these trusted resources to deepen your crafting knowledge and find more inspiration for your next project.
- Do It Yourself — Wikipedia Overview of DIY culture, history, and common techniques across woodworking, home improvement, and crafting.
- Handicraft — Wikipedia Background on traditional handicrafts, materials, and the cultural significance of handmade goods.
- Instructables Community-driven DIY project library with step-by-step photos, videos, and printable instructions.
- Woodworking — Wikipedia Techniques, tools, joinery methods, and the history of working with wood as a craft.
- Sewing — Wikipedia History and modern practice of sewing, including stitches, equipment, and fabric choices.
- Bob Vila Trusted home improvement, tool reviews, and illustrated how-to guides from a household name.
- Papercraft — Wikipedia Art forms that use paper as the primary medium, from origami to paper-mache.
- Michaels — Project Ideas Project walkthroughs, material lists, and weekly craft ideas from a major arts & crafts retailer.