How to Sew a Fabric Crown
Project Overview
Stitch a cute fabric crown with this simple crown tutorial. Great for birthdays, pretend play, or a fun beginner sewing project.
I had so much fun making this fabric crown, and it might be because my serger and I are becoming best friends.
Don't worry, you don't need one to make this project.
I'll show you how to sew it with or without a serger, so everyone can join in.
This fabric crown is perfect for birthdays, dress-up days, or just a little make-believe fun at home.
Please read all instructions first, because the triangle size varies when using a serger compared to a sewing machine.
To begin, you need to decide how big to make your triangles.
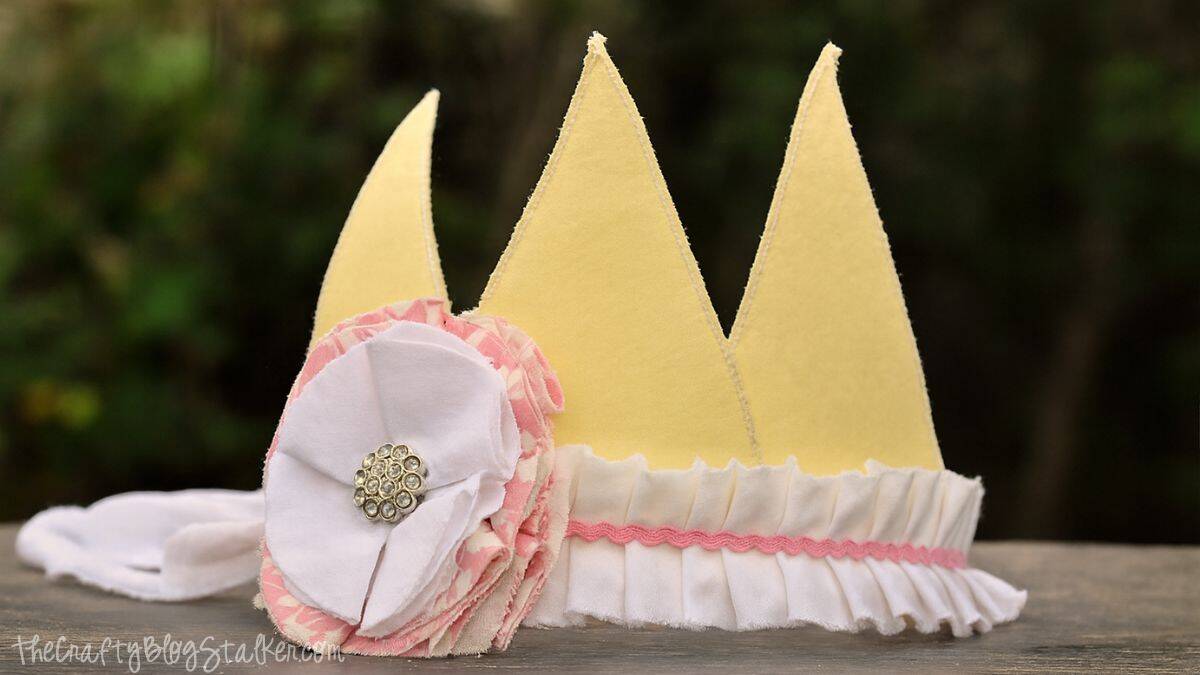
My daughter's head is about 18.5 inches around, and I wanted the crown to be about half of that, so 9 inches.
Also, consider how high you want the crown, and be careful not to make it too tall, or the tips will start to fall and won't stand up straight.
I decided to make my triangles 4 x 7 inches.
Cut 6 triangles out of the main fabric.
Then cut 3 triangles out of your craft interfacing that are slightly smaller than your fabric triangles.
Lay the interfacing on a triangle with the shiny side down and iron according to the instructions included.
Then, put another triangle on top of the interfacing. Serge around all three edges.
**If you do not have a serger, instead of "sandwiching" the interfacing, iron the interfacing to one triangle just as we did above, but then take your other triangle and put them right sides together, sew around, leaving a gap to turn.
Turn the fabric right side out and top stitch around.
This will eat up some of your width and height, so make sure you include it if you aren't serging the edges.**
Pin the triangles together with the middle one in the front, and then line up the other two on the sides.
Make sure your spacing is even in between each triangle and sew along the bottom to attach them.
Next, let's work on the ruffled strip.
I used a ruffle foot on my sewing machine, but you can do it without one.
I took my strip of white fabric (muslin), which was about 2 yards long and 2 inches wide, and found its middle.
I measured from the center until I had about 20 inches, with 10 inches on each side of the center point.
Then I ruffled until I had the width of my crown (9 inches long) and stopped there.
I was left with a long piece of fabric with ruffles in the middle (I guess they are more like pleats, either way).
Take the mini ric rac and invisible or coordinating thread and sew it down over the stitching that created your ruffles.
I left my ric rac long as well, so that it was mixed in with the extra muslin for tying.
Now, we can attach the ruffled/pleated fabric to the triangles, lining up the ruffled section with the base of the triangles.
Sew right down the middle of the ric rac again, making sure you are attaching it to the base of your crown (side view below).
I made a cutefabric flowerand glued it to the right side of the crown.
Lastly, I hot-glued a piece of elastic around the back of the crown to help it fit a bit more securely.
The back shows how I tied the bow with the fabric and ric rac.
Do you have a little girl who would want to wear a beautiful crown? It is such a fun little project to sew.
Don't put that sewing machine away yet! Here are a few more fun ideas to sew.
Hi, I'm Katie!
I'm so glad you're here. Want to make something fabulous? I'm here to help!
Materials Needed
- Colored cardstock or patterned paper
- Craft scissors or paper cutter
- Double-sided tape or glue stick
- Ruler and pencil
- Decorative elements (ribbons, stickers, washi tape)
- Cutting mat
- Scoring tool or bone folder
- Embellishments (buttons, sequins, stamps)
Step-by-Step Instructions
Prepare Your Materials
Gather all the required materials and tools. Make sure you have everything listed in the materials section before starting.
Set Up Your Workspace
Find a clean, well-lit area to work. Cover your surface with newspaper or a craft mat to protect it.
Follow the Main Steps
Carefully follow the instructions step by step. Take your time and don't rush through any part of the process.
Add Personal Touches
Once you've completed the basic project, feel free to add your own creative touches and personalization.
Final Assembly
Put all the pieces together according to the instructions. Double-check that everything is secure and properly attached.
Pro Tips
💡 Tip: Take your time and enjoy the creative process
💡 Tip: Don't be afraid to experiment with different colors or materials
💡 Tip: If you make a mistake, don't worry - it's all part of learning
💡 Tip: Share your finished project with friends and family
💡 Tip: Take photos of your progress to document your crafting journey
You Might Also Like

References & Further Reading
Explore these trusted resources to deepen your crafting knowledge and find more inspiration for your next project.
- Do It Yourself — Wikipedia Overview of DIY culture, history, and common techniques across woodworking, home improvement, and crafting.
- Handicraft — Wikipedia Background on traditional handicrafts, materials, and the cultural significance of handmade goods.
- Instructables Community-driven DIY project library with step-by-step photos, videos, and printable instructions.
- Woodworking — Wikipedia Techniques, tools, joinery methods, and the history of working with wood as a craft.
- Sewing — Wikipedia History and modern practice of sewing, including stitches, equipment, and fabric choices.
- Bob Vila Trusted home improvement, tool reviews, and illustrated how-to guides from a household name.
- Papercraft — Wikipedia Art forms that use paper as the primary medium, from origami to paper-mache.
- Michaels — Project Ideas Project walkthroughs, material lists, and weekly craft ideas from a major arts & crafts retailer.