How to Make a Happy Birthday Gift Box with Cricut
Project Overview
Use this Cricut box SVG to create a Happy Birthday gift box that's quick to make and adds a handmade touch to your celebration.
If you've ever wanted a cute way to package candy, jewelry, or other small birthday gifts, this Cricut box SVG is for you.
It's a thoughtful alternative to store-bought packaging and adds a personal, handmade touch to your present.
Choose the coordinating papers to match the recipient's style, and you've got a gift box that feels just as special as what's inside.
If videos are your thing, you're in luck-I've got a full tutorial ready for you!
Subscribe to my YouTube channeland stay inspired with every new project.
Some links may direct you to similar items when the exact item is not available online.
I used a Cricut Maker to cut my pieces. You could also use Cricut Explore or Cricut Joy Xtra.
For the following steps, I'll be using Cricut Design Space.
If you use Silhouette Studio or a different design software, your steps may be different than mine.
To start, upload the SVG into Cricut Design Space and add it to your Canvas.
The design is sized as large as can fit on a 12x12-inch sheet of cardstock. You can resize the project to make it smaller.
However, some pieces are already cut pretty small, so I don't recommend going that much smaller.
Highlight the entire design and ungroup.
When designing outside of Cricut Design Space, we cannot assign line functions for scoring, so we must make this adjustment when importing the file.
Select the blue square shape on top, go to Operations, and change that layer to score. This will change the blue square to dashed lines, so we know these lines are score.
Then attach the score lines to the box shape.
Click Make to take you to the mat preview.
I used several different types of material, paper, an acetate sheet, and thicker foil cardstock. These other materials have different cut settings, so I would need to adjust them before each mat.
Also, for the large box shape, I am using the scoring wheel, so I'll need to pay attention to when to insert that. The scoring stylus can be used instead if required.
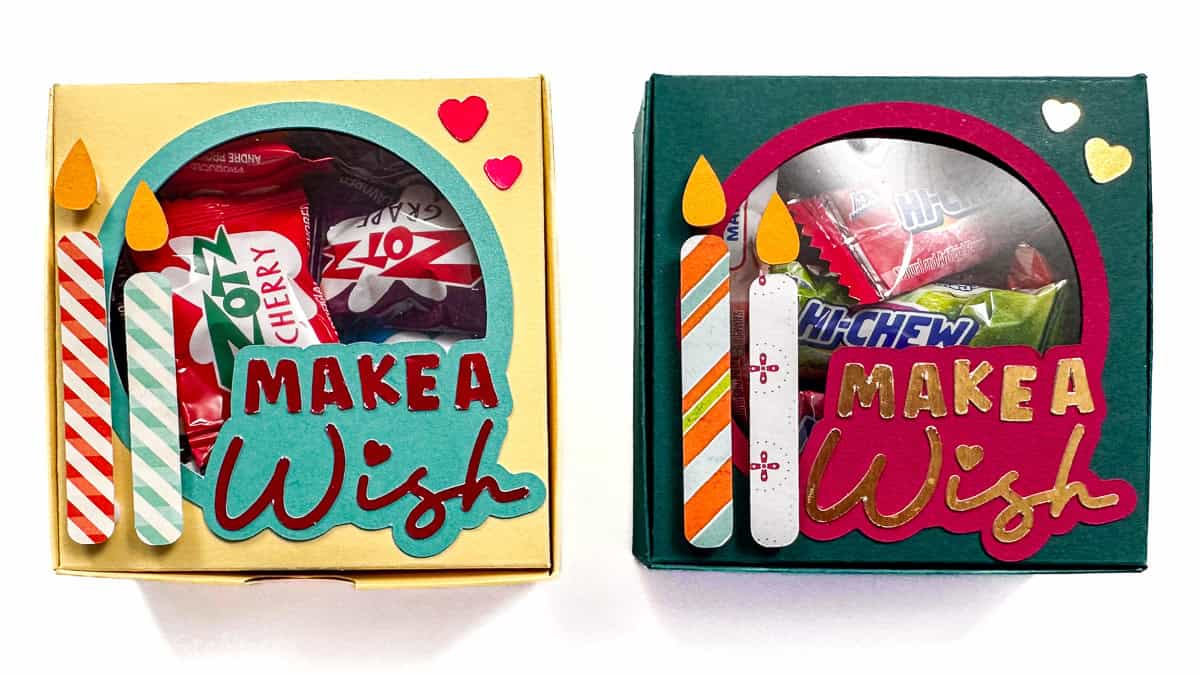
Here are all of the pieces that I cut. The acetate square is harder to see, but it is there.
Assembling the box itself is one of the last things I will do. I'll start with the decorative pieces.
This is where those tweezers really come in handy.
Add small dots of glue to the back of the letters. The precision tip really helps you control how much glue you use. I love it!
Then center the letters on the circle background piece. The spacing should be pretty even around all letters.
Repeat with all of the letters.
The side of the box where you can easily see the score lines is the inside of the box.
Before I glue the acetate sheet in place, I remove the protective lining. There is a cover on the front and on the back to protect it from scratches.
Apply a ring of glue around the lid of the box with the hole cut out, and then press the window sheet into the adhesive.
Turn the box shape over so the right side is facing up, and glue the saying piece over the hole.
Then glue the two small hearts in the upper right corner of the box lid. Wait to attach the candles.
Turn the box piece right side facing down, and fold in on all of the score lines going all around the box. Press a bone folder against the folds to get a really crisp fold.
The bottom section of the box is the only part that needs to be glued. Start by applying glue to the longest tabs.
Fold in and adhere to the side wall, ensuring a nice square corner.
Repeat with the other side of the box.
Next, apply glue to the smaller front tabs and attach them to the front panel of the box, ensuring the corners are nice and square.
The box bottom now has really tall sides. Apply glue to the inside of the tabs and fold them into the inside of the box.
Now we can add the candles to the front. Apply a few foam dots on the back of the candles and the flames.
If needed, use the tweezers to place them on the top of the box. I put the longer candle closer to the outside edge of the box, and the short candle to the right of it.
Now all that's left is to fill it! Zots anyone? Make sure not to overfill, otherwise the lid will be more challenging to close, and the box will lose its square shape.
Now the birthday box is ready to gift!
These are great for teacher gifts, coworker gifts, neighbor gifts, or for anyone that has a birthday! ÄŸËâ?Who will you make them for?
Don't put your Cricut away, let's keep crafting! Here are a few more fun ideas.
Hi, I'm Katie!
I'm so glad you're here. Want to make something fabulous? I'm here to help!
Materials Needed
- Colored cardstock or patterned paper
- Craft scissors or paper cutter
- Double-sided tape or glue stick
- Ruler and pencil
- Decorative elements (ribbons, stickers, washi tape)
- Cutting mat
- Scoring tool or bone folder
- Embellishments (buttons, sequins, stamps)
Step-by-Step Instructions
Prepare Your Materials
Gather all the required materials and tools. Make sure you have everything listed in the materials section before starting.
Set Up Your Workspace
Find a clean, well-lit area to work. Cover your surface with newspaper or a craft mat to protect it.
Follow the Main Steps
Carefully follow the instructions step by step. Take your time and don't rush through any part of the process.
Add Personal Touches
Once you've completed the basic project, feel free to add your own creative touches and personalization.
Final Assembly
Put all the pieces together according to the instructions. Double-check that everything is secure and properly attached.
Pro Tips
💡 Tip: Take your time and enjoy the creative process
💡 Tip: Don't be afraid to experiment with different colors or materials
💡 Tip: If you make a mistake, don't worry - it's all part of learning
💡 Tip: Share your finished project with friends and family
💡 Tip: Take photos of your progress to document your crafting journey
You Might Also Like
References & Further Reading
Explore these trusted resources to deepen your crafting knowledge and find more inspiration for your next project.
- Do It Yourself — Wikipedia Overview of DIY culture, history, and common techniques across woodworking, home improvement, and crafting.
- Handicraft — Wikipedia Background on traditional handicrafts, materials, and the cultural significance of handmade goods.
- Instructables Community-driven DIY project library with step-by-step photos, videos, and printable instructions.
- Woodworking — Wikipedia Techniques, tools, joinery methods, and the history of working with wood as a craft.
- Sewing — Wikipedia History and modern practice of sewing, including stitches, equipment, and fabric choices.
- Bob Vila Trusted home improvement, tool reviews, and illustrated how-to guides from a household name.
- Papercraft — Wikipedia Art forms that use paper as the primary medium, from origami to paper-mache.
- Michaels — Project Ideas Project walkthroughs, material lists, and weekly craft ideas from a major arts & crafts retailer.