How To Frame Diamond Art
Project Overview
Ready to show off your diamond art? Frame your masterpiece in 4 easy steps and turn hard work into a stunning, display-worthy piece.
Did you just finish a beautiful diamond art painting? All that work and all that time! Now, what to do with it?
I am obsessed with Diamond Arts! It is so relaxing and helps me clear my mind.
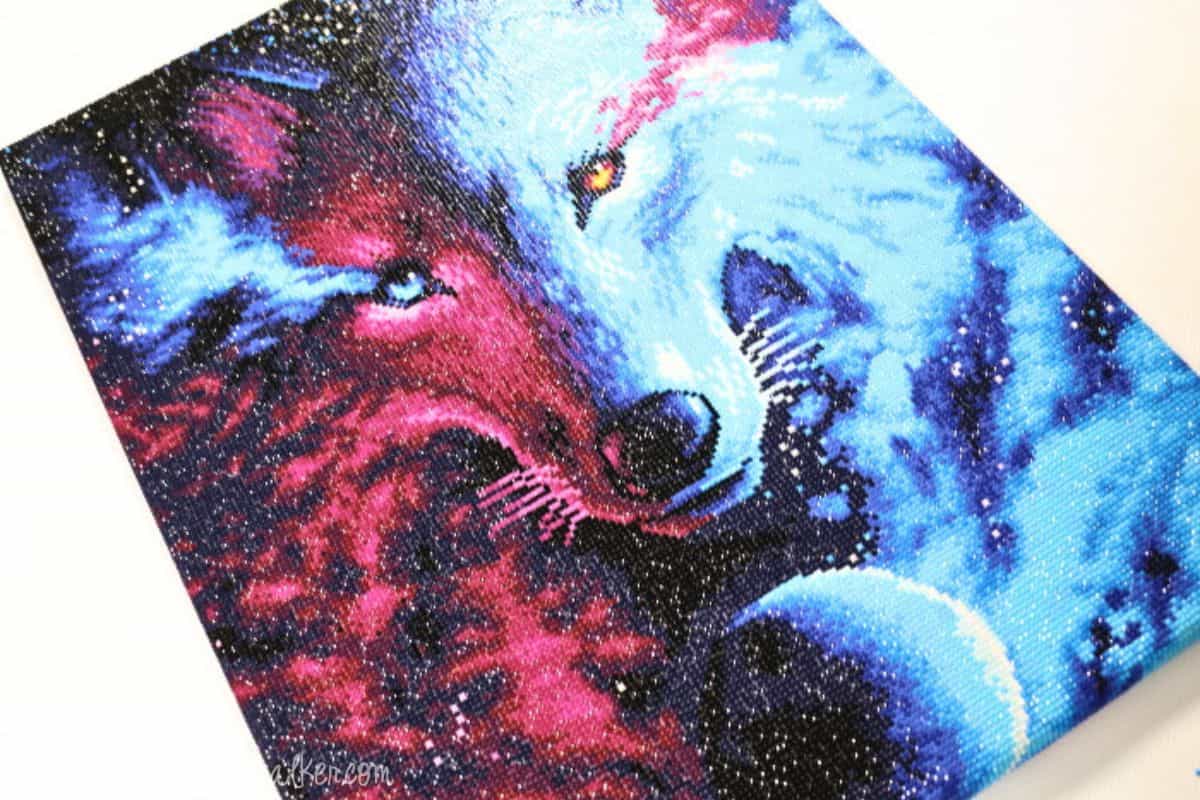
I just finished Where Light and Dark Meet from theDiamond Art Club. It is quite large and took many hours, but I love how it looks completed.
With so much time spent, I can't just roll it up and put it away. This masterpiece should be put on display!
Be aware that this tutorial isn't for everybody. Some of the paintings may need to be cut off, but the finished framed art is beautiful!
If videos are your thing, you're in luck-I've got a full tutorial ready for you!
Subscribe to my YouTube channeland stay inspired with every new project.
Some links may direct you to similar items when the exact item is not available online.
Measure the finished size of your paint, only measuring the area where the diamond drills are.
Choose a canvas that is smaller than the finished art.
My finished diamond art measured 20.5 x 27.8 inches, excluding the border.
The closest standard-sized blank canvas I could find, which was slightly smaller, measured 18 x 24 inches.
The canvas should be smaller so the diamond art can be wrapped around the canvas to have those sparkling diamonds on the side.
As a heads-up, I am not measuring anything, but feel free to measure for a more exact placement.
To begin, apply a layer of glue to the canvas.
The canvas can be any color. Mine is black because they were cheaper at my craft store.
Do not use fast-drying adhesive because. The art should be able to move around before it dries.
Carefully lay the diamond art on top of the canvas and eyeball the center.
Work quickly, and while the glue is still wet, press the edges of the diamond art down over the edges of the canvas.
Slide the art until the edges can be evenly wrapped with the art.
When the art is correctly placed, use a brayer to push the art into the glue on the canvas. Turn over and brayer the backside as well.
Place the diamond canvas upside down on a cutting mat. Trim the edges of the diamond art so they extend out about 2 inches from the edge of the canvas.
Cutting through the diamond art canvas with a steel ruler and an X-acto knife.
Next, we want to prep the corners for wrapping around the canvas.
Wrap the art around an edge of the canvas and check the amount needed to wrap the edges completely.
I needed 1.5 inches, which is the same width as my ruler.
So I pressed the ruler against the canvas and traced the ruler's edge with a craft knife to cut off the excess art.
Do this on each corner of the canvas and remove the rectangles.
To wrap, tightly pull the art up over the side of the canvas and staple the art into the wood frame with a staple gun.
Make sure the staples are going through the wood frame of the canvas, not the diamond painting canvas itself. Put five staples on each side.
I stapled first in the middle, then at each end, and finally the two center sections.
This helps to keep the back of the canvas looking clean.
Look at the edges of my new diamond artwork, they look so clean!
I am obsessed and absolutely LOVE how this diamond art framing looks!
It is a matter of preference; there isn't a right or wrong way. Glass can protect the diamond drills from falling off and also shield the art from dust.
Diamond art does not need to be sealed before framing, but a sealer can help protect the art. For a comparison of different sealants, readThe Best Diamond Sealant.
Want more information on diamond painting, and what diamond art is? Check out my postHow to Diamond Art with Diamond Art Club.
Don't want to cut the diamond painting? Here are more ways toFrame Diamond Paintings.
ShopDiamond Art Clubfor beautiful diamond painting kits!
Want more diamond painting crafts? Here are a few more fun ideas.
Hi, I'm Katie!
I'm so glad you're here. Want to make something fabulous? I'm here to help!
Materials Needed
- Colored cardstock or patterned paper
- Craft scissors or paper cutter
- Double-sided tape or glue stick
- Ruler and pencil
- Decorative elements (ribbons, stickers, washi tape)
- Cutting mat
- Scoring tool or bone folder
- Embellishments (buttons, sequins, stamps)
Step-by-Step Instructions
Prepare Your Materials
Gather all the required materials and tools. Make sure you have everything listed in the materials section before starting.
Set Up Your Workspace
Find a clean, well-lit area to work. Cover your surface with newspaper or a craft mat to protect it.
Follow the Main Steps
Carefully follow the instructions step by step. Take your time and don't rush through any part of the process.
Add Personal Touches
Once you've completed the basic project, feel free to add your own creative touches and personalization.
Final Assembly
Put all the pieces together according to the instructions. Double-check that everything is secure and properly attached.
Pro Tips
💡 Tip: Take your time and enjoy the creative process
💡 Tip: Don't be afraid to experiment with different colors or materials
💡 Tip: If you make a mistake, don't worry - it's all part of learning
💡 Tip: Share your finished project with friends and family
💡 Tip: Take photos of your progress to document your crafting journey
You Might Also Like
References & Further Reading
Explore these trusted resources to deepen your crafting knowledge and find more inspiration for your next project.
- Do It Yourself — Wikipedia Overview of DIY culture, history, and common techniques across woodworking, home improvement, and crafting.
- Handicraft — Wikipedia Background on traditional handicrafts, materials, and the cultural significance of handmade goods.
- Instructables Community-driven DIY project library with step-by-step photos, videos, and printable instructions.
- Woodworking — Wikipedia Techniques, tools, joinery methods, and the history of working with wood as a craft.
- Sewing — Wikipedia History and modern practice of sewing, including stitches, equipment, and fabric choices.
- Bob Vila Trusted home improvement, tool reviews, and illustrated how-to guides from a household name.
- Papercraft — Wikipedia Art forms that use paper as the primary medium, from origami to paper-mache.
- Michaels — Project Ideas Project walkthroughs, material lists, and weekly craft ideas from a major arts & crafts retailer.