How to Make a Personalized Cutting Board
Project Overview
Need a unique and thoughtful gift idea? Learn how to personalize a cutting board and create a thoughtful gift for any occasion.
Looking to add a personal touch to your gift-giving? Look no further!
Personalized cutting boards are a fantastic way to show your friends and family how much you love them!
Explore how to personalize a cutting board. This guide offers step-by-step instructions for creating a meaningful and memorable gift for any occasion.
Let's get started and gift something special!
If videos are your thing, you're in luck-I've got a full tutorial ready for you!
Subscribe to my YouTube channeland stay inspired with every new project.
Some links may direct you to similar items when the exact item is not available online.
The exact stencil I used is no longer available on Etsy, but I did find a similarMonogram SVG Filehere.
Purchase the design from Etsy and upload the file into Cricut Design Space.
Size the file to fit how you want on your cutting board.
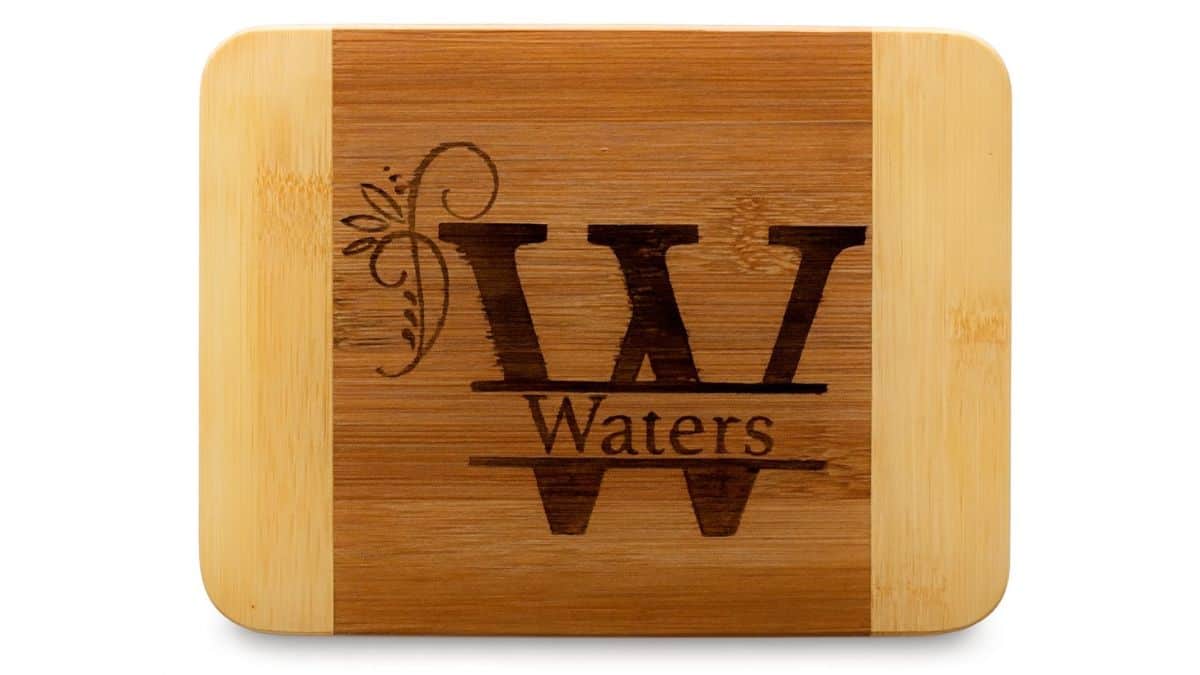
For my cutting boards, I wanted the design centered on the darker part of the board, so I sized it accordingly.
Cut the design out of vinyl using your Cricut cutting machine.
Weed the design using some vinyl weeding tools.
Since I am using the vinyl as a stencil, remove the positive of the design (or the text) and leave the negative.
I love to use my BrightPad when weeding because it helps me see the cut lines, but it is entirely optional.
Place a piece of transfer tape over the top of the vinyl stencil.
The cutting board I am using is bamboo. I love how the wood grain looks, and they hold up really well.
Sand the cutting board using 220-grit sandpaper.
The smoother the surface, the less likely the ink will bleed when coloring with the marker.
Lay the vinyl stencil onto the cutting board where you want the design.
Slowly and carefully peel back the transfer tape.
Vinyl doesn't like to stick to wood, so press the vinyl down with the scraper tool as you peel.
Then press the vinyl into the wood using your finger, pushing out any bubbles.
With a paper towel handy, color in the stencil with the wood-burning marker.
Dab the tip of the marker on the paper towel periodically, as you don't want excess ink, which can cause the design to bleed.
You can also dab the paper towel onto the top of the wood to absorb any excess.
Depending on the color of the wood, it may be hard to see the marker ink on the cutting board, but it is there. You don't need to add more ink to try to see it.
Heat the heat gun to 1000° F.
Leave the vinyl stencil on the board and apply the heat all over the inked design.
Be careful not to add heat around the outside of the stencil. You only want the burn to show inside the stencil area where you applied the marker.
While the vinyl stencil is still warm, peel back the vinyl stencil with a weeding tool. If you wait too long, the vinyl will leave a sticky residue since it has been heated.
To protect the board, apply some Cutting Board Oil with a paper towel, rag, or cotton round like I did.
Let the cutting board "dry" for at least an hour before packaging to gift.
Slide the custom cutting board into a clear cellophane gift bag. Mine measured 8 x 12 inches.
On the backside of the board, slid in some cheese, summer sausage, and a cheese knife.
Fold the cellophane bag over itself and secure it with tape.
On one side, you'll see the personalized cutting board.
And on the other side, you'll see the yummy cheese and sausage.
These cute little packages make such great gifts! Here are the items I included.
Yes, you can use your personalized cutting board. Here are a few tips to keep a cutting board in great shape.You cannot remove cut marks from a wood-cutting board. Cut on the back and display the front of the cutting board.Apply mineral oil regularly to prolong the life of the cutting board.Do not place a wood-burned cutting board in the dishwasher. Hand wash only.Use the cutting board as a serving board; it will be used and enjoyed without damaging the board.
This is a constant debate, and since I am not a doctor or a scientist, I can't give you a 100% answer.When I am done wood-burning, I wash the cutting board with mild soap and water, seal it with cutting board oil, and then use it with no problem.However, if you're concerned, you can always play it safe and use only the back of the board for food preparation.
Want more DIY gift ideas? I've got you covered! Here are a few more fun ideas.
Hi, I'm Katie!
I'm so glad you're here. Want to make something fabulous? I'm here to help!
Materials Needed
- Fresh ingredients (vegetables, meats, herbs)
- Cooking oil or butter
- Salt and pepper
- Mixing bowls
- Cutting board and knife
- Measuring cups and spoons
- Cooking utensils (spatula, wooden spoon)
- Baking sheet or cooking pan
Step-by-Step Instructions
Prepare Your Materials
Gather all the required materials and tools. Make sure you have everything listed in the materials section before starting.
Set Up Your Workspace
Find a clean, well-lit area to work. Cover your surface with newspaper or a craft mat to protect it.
Follow the Main Steps
Carefully follow the instructions step by step. Take your time and don't rush through any part of the process.
Add Personal Touches
Once you've completed the basic project, feel free to add your own creative touches and personalization.
Final Assembly
Put all the pieces together according to the instructions. Double-check that everything is secure and properly attached.
Pro Tips
💡 Tip: Take your time and enjoy the creative process
💡 Tip: Don't be afraid to experiment with different colors or materials
💡 Tip: If you make a mistake, don't worry - it's all part of learning
💡 Tip: Share your finished project with friends and family
💡 Tip: Take photos of your progress to document your crafting journey
You Might Also Like
References & Further Reading
Explore these trusted resources to deepen your crafting knowledge and find more inspiration for your next project.
- Do It Yourself — Wikipedia Overview of DIY culture, history, and common techniques across woodworking, home improvement, and crafting.
- Handicraft — Wikipedia Background on traditional handicrafts, materials, and the cultural significance of handmade goods.
- Instructables Community-driven DIY project library with step-by-step photos, videos, and printable instructions.
- Woodworking — Wikipedia Techniques, tools, joinery methods, and the history of working with wood as a craft.
- Sewing — Wikipedia History and modern practice of sewing, including stitches, equipment, and fabric choices.
- Bob Vila Trusted home improvement, tool reviews, and illustrated how-to guides from a household name.
- Papercraft — Wikipedia Art forms that use paper as the primary medium, from origami to paper-mache.
- Michaels — Project Ideas Project walkthroughs, material lists, and weekly craft ideas from a major arts & crafts retailer.