Make Two Turtle Doves Felt Christmas Ornaments
Project Overview
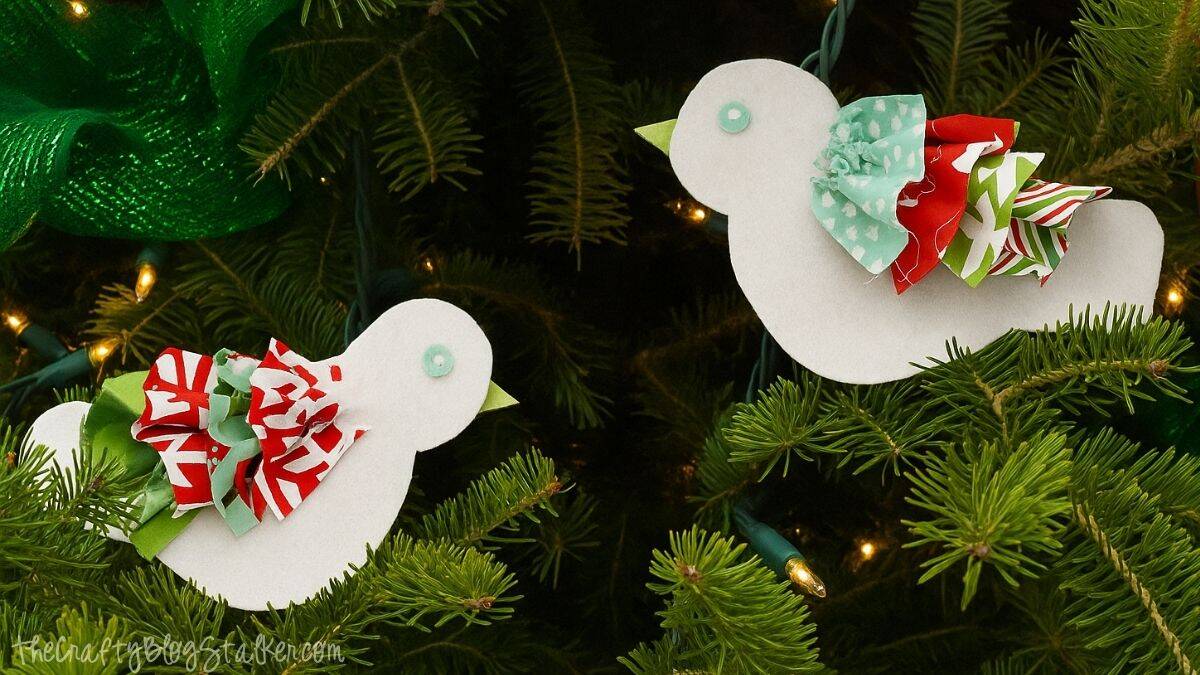
These two turtle dove felt Christmas ornaments are easy to make and full of charm. A quick, handmade project that adds warmth to your tree.
I had big plans to make a stuffed 3D bird, but let's be honest, sometimes you just have to know your limits.
Instead of going full plushie mode, I found a way to keep things simple while still using fabric.
These felt Christmas ornaments feature sweet little tiryle doves with ruffled fabric wings that add just the right amount of texture and charm.
They're fun to make, beginner-friendly, and a lovely handmade addition to your holiday decor.
To start, iron the fusible interfacing onto the white felt.
The interfacing keeps the birds stiff, so they sit in the tree a bit better.
Hand-draw bird shapes onto the interfacing side and cut them out using scissors.
I don't have the best drawing skills, but the shape doesn't need to be fancy.
If you would prefer a template to freehand, I do have abird-shaped SVG.
The width of jelly roll strips is 2.5 inches. Cut a section about 1.5 inches of different coordinating fabrics.
If you're using a sewing machine, load elastic thread in the bobbin, and sew along the edge to ruffle.
You can also hand-stitch them with a basting stitch and pull the thread to create the ruffle.
Ruffle 4 strips for each bird.
Arrange the ruffled strips on the bird until they are arranged how you like.
Then adhere the ruffles with Hot glue. I found it easiest to start at the bottom and work my way up.
Cut out a tiny circle and triangle for the eye and beak, and hot glue them into place.
I decided not to add a ribbon hanger to the back because I like how they look sitting on the branches, but you could easily glue one on if you'd rather.
Now you have two turtle doves with fun, ruffled-feathered fabric! They are so cute!!!
Making Christmas ornaments is my favorite part of the holiday! Here are a few more fun ideas.
Hi, I'm Katie!
I'm so glad you're here. Want to make something fabulous? I'm here to help!
Materials Needed
- Fabric (cotton, linen, or specialty fabric)
- Thread (matching or contrasting colors)
- Sewing needles or sewing machine
- Fabric scissors
- Pins and pincushion
- Measuring tape
- Iron and ironing board
- Pattern or template
Step-by-Step Instructions
Prepare Your Materials
Gather all the required materials and tools. Make sure you have everything listed in the materials section before starting.
Set Up Your Workspace
Find a clean, well-lit area to work. Cover your surface with newspaper or a craft mat to protect it.
Follow the Main Steps
Carefully follow the instructions step by step. Take your time and don't rush through any part of the process.
Add Personal Touches
Once you've completed the basic project, feel free to add your own creative touches and personalization.
Final Assembly
Put all the pieces together according to the instructions. Double-check that everything is secure and properly attached.
Pro Tips
💡 Tip: Take your time and enjoy the creative process
💡 Tip: Don't be afraid to experiment with different colors or materials
💡 Tip: If you make a mistake, don't worry - it's all part of learning
💡 Tip: Share your finished project with friends and family
💡 Tip: Take photos of your progress to document your crafting journey
You Might Also Like
References & Further Reading
Explore these trusted resources to deepen your crafting knowledge and find more inspiration for your next project.
- Do It Yourself — Wikipedia Overview of DIY culture, history, and common techniques across woodworking, home improvement, and crafting.
- Handicraft — Wikipedia Background on traditional handicrafts, materials, and the cultural significance of handmade goods.
- Instructables Community-driven DIY project library with step-by-step photos, videos, and printable instructions.
- Woodworking — Wikipedia Techniques, tools, joinery methods, and the history of working with wood as a craft.
- Sewing — Wikipedia History and modern practice of sewing, including stitches, equipment, and fabric choices.
- Bob Vila Trusted home improvement, tool reviews, and illustrated how-to guides from a household name.
- Papercraft — Wikipedia Art forms that use paper as the primary medium, from origami to paper-mache.
- Michaels — Project Ideas Project walkthroughs, material lists, and weekly craft ideas from a major arts & crafts retailer.