Make Halloween Shaped Crayons with Free Printable Tags
Project Overview
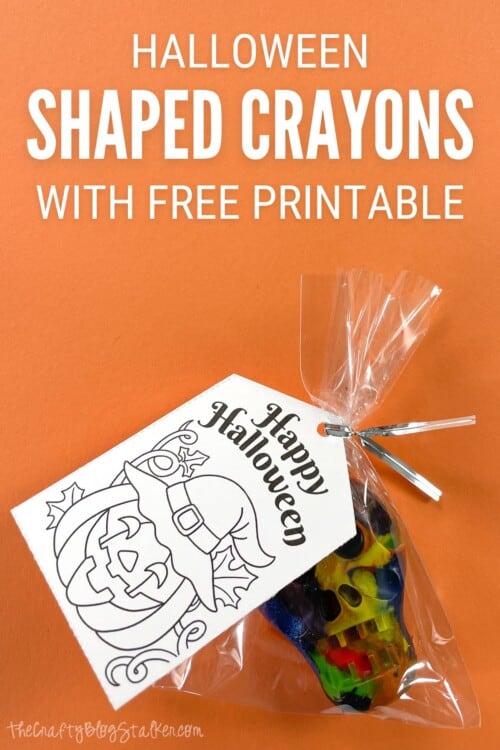
Transform traditional crayons into Halloween-themed crayons with these instructions on how to make shaped crayons. Tags are printable and easy to make.
Looking for a non-candy treat to hand out to trick-or-treaters this Halloween?
These DIY Halloween shaped crayons are so much fun to make. Wrap them up with a colorable tag, and they are ready to hand out to friends, family, or kids in the neighborhood!
Plus, all of the supplies needed can be found at your local Dollar Tree or you may already have them on hand. So they're cheap and easy!
If videos are your thing, you're in luck-I've got a full tutorial ready for you!
Subscribe to my YouTube channeland stay inspired with every new project.
The easiest way to unwrap the crayons is to soak them in a warm water bath. No soap is needed.
Let them sit for about 3-5 minutes.
Then stir the crayons with your hand and the wrappers will start to come off all on their own, and float to the top.
Seriously, it is that easy!
Of course, there will be a few that will still take a little bit of peeling with your fingers, but there won't be many, and wet labels make them much easier to peel than if they were dry.
Remove the peeled crayons from the water and pat dry with a towel.
Break the crayons into smaller pieces, and put them into the silicone mold.
I broke my crayons in half, but if you are using well-loved crayons you may not need to break them into smaller pieces.
Just make sure that they fit inside the mold.
Fill the molds about as full as you can.
Place the mold on a baking sheet, and place it in a preheated oven at 200º F.
Time may vary based on the size of your molds and the crayons you use, but they should completely melt in about 10-15 minutes.
If you need longer, that is totally okay. But keep checking on them every couple of minutes.
Once the crayon pieces are completely melted inside the molds, remove the baking sheet from the oven.
To help the crayons harden faster you can place them in a fridge or freezer.
Once they are completely set, you can pop them out of the silicone mold.
Aren't they so cute? Look at all of those fun colors!
Print out the Halloween tags on your home printer.
Use a pair of scissors or a paper trimmer and cut the tags out, along the dotted line.
Then punch a hole at the top of the tag with a hole punch.
Place a shaped crayon inside the cellophane bag.
Twist the top.
Push a twist tie through the hole in the tag, wrap the twist tie around the top of the bag, and you are done!
No, you can melt down any brand of crayons to make fun-shaped crayons.
Although, different brands of crayons may melt at different rates so you may need to adjust the baking time.
I am not an expert in crayons, but in my personal opinion, I prefer Crayola. They slide over paper better leaving beautiful color.
Other brands tend to have more of a cheap waxy feel.
But if you prefer other brands that is ok. Just know that the crayons will color the same before and after being melted. Having them melted into shapes makes no difference in how they feel when coloring with them.
Absolutely not! In fact, this project is the perfect way to give new life to used and broken crayons.
I don't have littles anymore, so my boxes of used crayons were long ago donated.
The oven is my go-to way to melt crayons. It is really easy and all you need is a silicone mold and an oven!
Preheat the oven to 200º and bake until completely melted. Should take about 10-15 minutes, but it is ok if they take longer. Just keep an eye on them.
Materials Needed
- Colored cardstock or patterned paper
- Craft scissors or paper cutter
- Double-sided tape or glue stick
- Ruler and pencil
- Decorative elements (ribbons, stickers, washi tape)
- Cutting mat
- Scoring tool or bone folder
- Embellishments (buttons, sequins, stamps)
Step-by-Step Instructions
Prepare Your Materials
Gather all the required materials and tools. Make sure you have everything listed in the materials section before starting.
Set Up Your Workspace
Find a clean, well-lit area to work. Cover your surface with newspaper or a craft mat to protect it.
Follow the Main Steps
Carefully follow the instructions step by step. Take your time and don't rush through any part of the process.
Add Personal Touches
Once you've completed the basic project, feel free to add your own creative touches and personalization.
Final Assembly
Put all the pieces together according to the instructions. Double-check that everything is secure and properly attached.
Pro Tips
💡 Tip: Take your time and enjoy the creative process
💡 Tip: Don't be afraid to experiment with different colors or materials
💡 Tip: If you make a mistake, don't worry - it's all part of learning
💡 Tip: Share your finished project with friends and family
💡 Tip: Take photos of your progress to document your crafting journey
You Might Also Like

References & Further Reading
Explore these trusted resources to deepen your crafting knowledge and find more inspiration for your next project.
- Do It Yourself — Wikipedia Overview of DIY culture, history, and common techniques across woodworking, home improvement, and crafting.
- Handicraft — Wikipedia Background on traditional handicrafts, materials, and the cultural significance of handmade goods.
- Instructables Community-driven DIY project library with step-by-step photos, videos, and printable instructions.
- Woodworking — Wikipedia Techniques, tools, joinery methods, and the history of working with wood as a craft.
- Sewing — Wikipedia History and modern practice of sewing, including stitches, equipment, and fabric choices.
- Bob Vila Trusted home improvement, tool reviews, and illustrated how-to guides from a household name.
- Papercraft — Wikipedia Art forms that use paper as the primary medium, from origami to paper-mache.
- Michaels — Project Ideas Project walkthroughs, material lists, and weekly craft ideas from a major arts & crafts retailer.