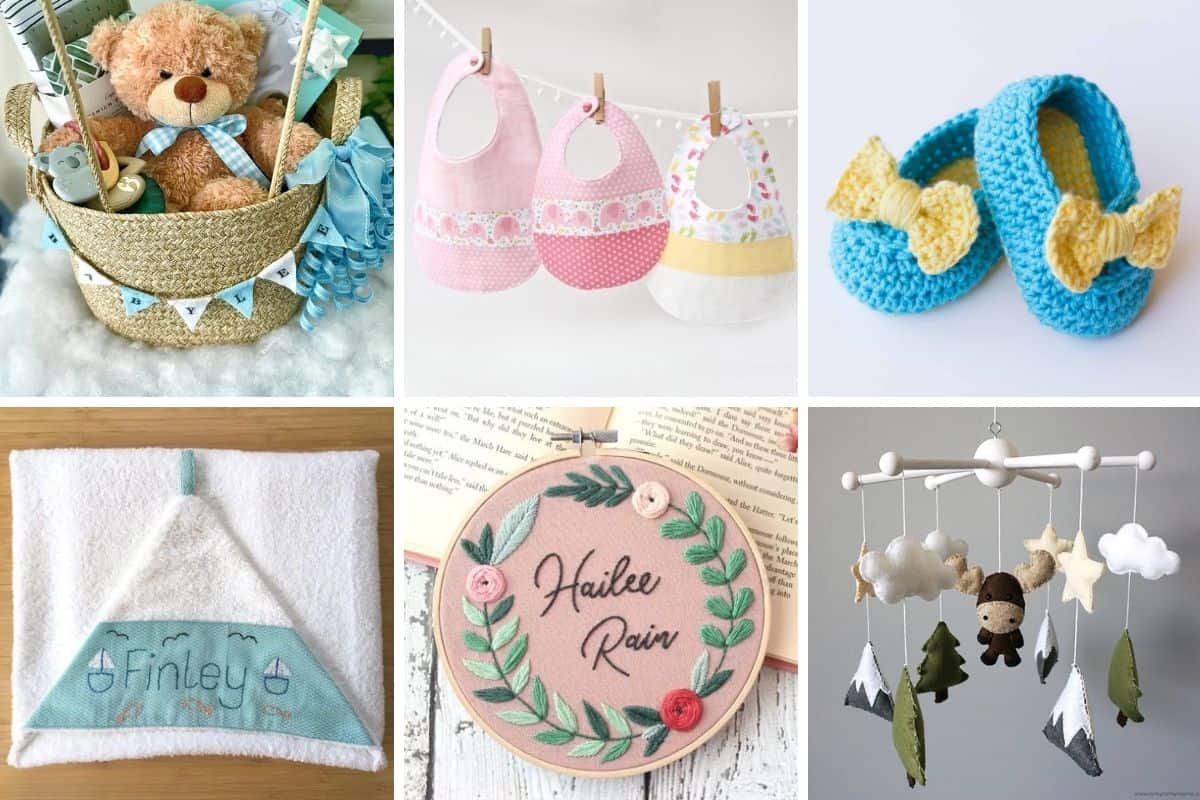
20 Homemade Baby Shower Gifts
Project Overview
Homemade baby shower gifts don't have to be complicated. These 20 ideas are perfect for a new mom, and way more fun to give than another pack of diapers.
If you've got a baby shower coming up and want to bring something a little more personalized, homemade baby shower gifts are the way to go.
They're thoughtful, and let's be honest-way more fun to make than wandering the baby aisle for the tenth time.
Whether you sew, crochet, or are a Cricut maker, these DIY baby shower gifts are doable and actually useful for new parents.
Visit each website for step-by-step directions. All links will open in the same tab.
Got a baby and a Cricut? This DIY onesie, featuring the free "Holy Cow I'm Cute" SVG, is a quick and fun project that's sure to get plenty of compliments.
Want to try quilting without the stress? Sew a fabric strip rag quilt using jelly rolls and follow this step-by-step guide made for beginners.
Grab the free SVG and make your own monthly milestone markers-an easy DIY that helps document your baby's first year without overthinking it.
Sew cloth diaper burp cloths quickly with this beginner-friendly tutorial. They're simple, practical, and way cuter than store-bought ones.
Create a cozy crochet stocking hat for babies and toddlers with this easy-to-follow pattern-perfect for chilly days, capturing cute photos, or making handmade gifts.
This footed baby pants pattern has saved more baby toes than I can count. Great for newborns, easy to sew, and perfect for DIY gifts.
This felt woodland baby mobile is a charming, beginner-friendly project that adds a handmade touch to your nursery with minimal fuss.
This free baby hat pattern is a fun way to prep for a new arrival. It's simple to sew, budget-friendly, and makes a great keepsake for your little one.
Skip the overpriced clips and make your own fabric pacifier holders. They're easy to sew, super handy, and make excellent baby shower gifts too.
Add a sweet personal touch to a store-bought towel with this easy DIY. Embroider a baby's name and you've got a gift that's both cute and actually useful.
Sew a DIY baby blanket that's softer, bigger, and way more personal than store-bought. Available in multiple sizes, with simple steps, and perfect for gifting.
Learn how to make a baby shower gift basket that looks as special as the gift inside. This DIY idea adds a fun, personal touch without going overboard.
This DIY diaper caddy and changing pad combo keeps dipes, wipes, and sanity all in one spot. Easy to sew and great to keep in the diaper bag.
Sew a wooden ring crinkle teether that's cute, chewable, and easy for the baby to hold. Bonus: it makes just enough noise to entertain without driving you nuts.
These Lemon Drop baby booties are a quick crochet project that's cute, comfy, and just right for baby showers or sunny afternoon strolls.
Looking for a handmade baby gift? This floral name embroidery hoop pattern is simple, personal, and comes with a full stitch-along video tutorial.
Keep baby's hands warm and scratch-free with these simple DIY mittens. They're quick to make with a sewing machine, and easy to customize.
This free tinkle tent pattern is a fast sew that saves your shirt (and sanity). Perfect for new parents of baby boys who like to surprise mid-change.
Create your own baby bibs with this easy, free pattern available in three sizes. Great for gifting or capturing all the messy moments from birth to toddlerhood.
This DIY sensory baby block toy is a fun, beginner-friendly project that's perfect for gifting, playing, and using up those adorable fabric leftovers.
Handmade gifts aren't just for babies! Here are a few more DIY gift guides.
Hi, I'm Katie!
I'm so glad you're here. Want to make something fabulous? I'm here to help!
Materials Needed
- Wood boards or planks (appropriate size)
- Sandpaper (various grits: 120, 220, 400)
- Wood glue
- Wood stain or paint
- Saw (hand saw or power saw)
- Drill and drill bits
- Measuring tape and square
- Protective finish (polyurethane or wood oil)
Step-by-Step Instructions
Prepare Your Materials
Gather all the required materials and tools. Make sure you have everything listed in the materials section before starting.
Set Up Your Workspace
Find a clean, well-lit area to work. Cover your surface with newspaper or a craft mat to protect it.
Follow the Main Steps
Carefully follow the instructions step by step. Take your time and don't rush through any part of the process.
Add Personal Touches
Once you've completed the basic project, feel free to add your own creative touches and personalization.
Final Assembly
Put all the pieces together according to the instructions. Double-check that everything is secure and properly attached.
Pro Tips
💡 Tip: Take your time and enjoy the creative process
💡 Tip: Don't be afraid to experiment with different colors or materials
💡 Tip: If you make a mistake, don't worry - it's all part of learning
💡 Tip: Share your finished project with friends and family
💡 Tip: Take photos of your progress to document your crafting journey
You Might Also Like
References & Further Reading
Explore these trusted resources to deepen your crafting knowledge and find more inspiration for your next project.
- Do It Yourself — Wikipedia Overview of DIY culture, history, and common techniques across woodworking, home improvement, and crafting.
- Handicraft — Wikipedia Background on traditional handicrafts, materials, and the cultural significance of handmade goods.
- Instructables Community-driven DIY project library with step-by-step photos, videos, and printable instructions.
- Woodworking — Wikipedia Techniques, tools, joinery methods, and the history of working with wood as a craft.
- Sewing — Wikipedia History and modern practice of sewing, including stitches, equipment, and fabric choices.
- Bob Vila Trusted home improvement, tool reviews, and illustrated how-to guides from a household name.
- Papercraft — Wikipedia Art forms that use paper as the primary medium, from origami to paper-mache.
- Michaels — Project Ideas Project walkthroughs, material lists, and weekly craft ideas from a major arts & crafts retailer.