DIY Glass Etched Monogram Candy Jar
Project Overview
Personalize a candy jar with glass etching! Our guide shows you how to create a monogrammed etched candy jar for a unique, custom look.
Today's project is extra special because it's not just for me-it's a gift for my "secret friend" at work.
We have this delightful tradition where we secretly do something nice for a coworker for three months.
And guess what? This month, I'm crafting a Glass Etched Monogram Candy Jar!
The best part? I already have all the supplies on hand!
So, if you're intrigued by the idea of glass etching or you're looking for unique gift ideas, stick around. Let's get crafting!
Some links may direct you to similar items when the exact item is not available online.
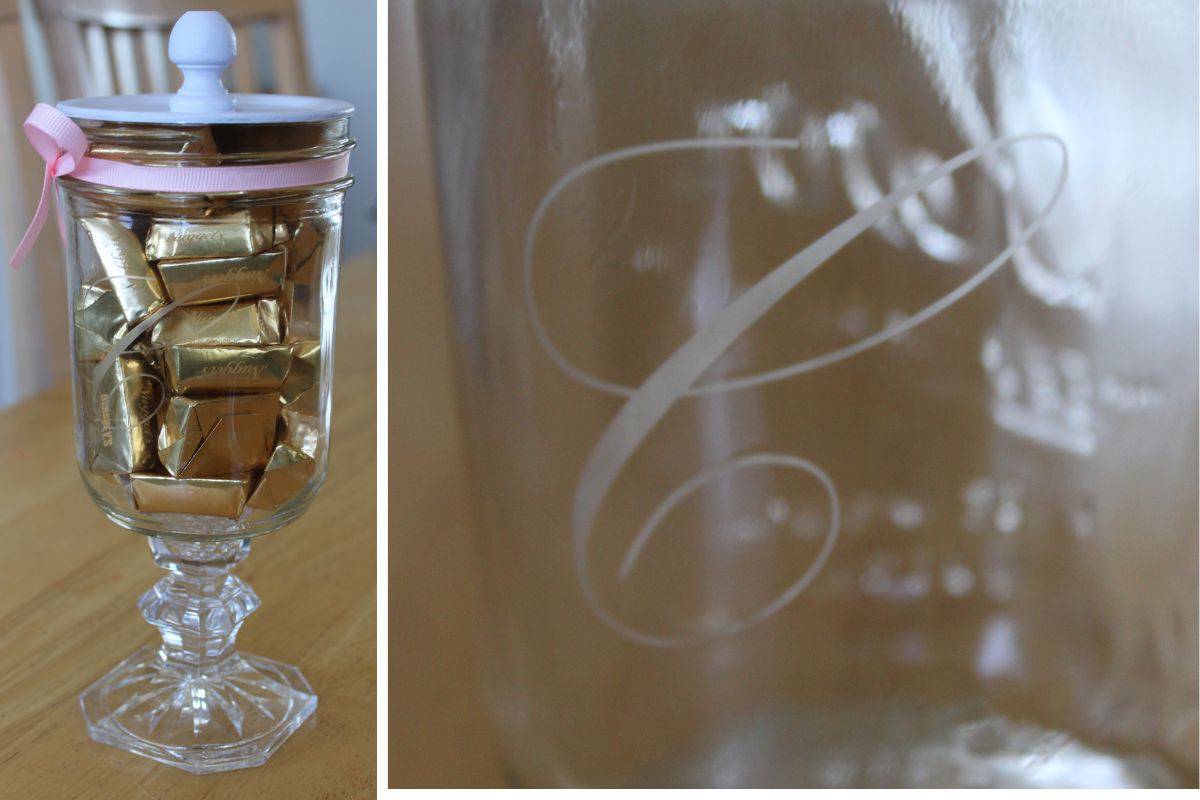
To start, I cut a fancy letter C (but you can cut whatever monogram letter you need) out of vinyl with a Cricut.
Cut a rectangle of Transfer Tape that was slightly larger than the design and apply it to the front of the cut vinyl.
Position the decal on the jar and press it into place.
Peel back the transfer tape and the vinyl design should stay stuck to the mason jar.
Add a scoop of etching cream over the design and make sure it is covered completely.
I am not sure why my etching cream has turned brown, but it still worked so I wasn't too worried about it.
Let the cream sit for about 20 minutes, making sure that it doesn't drip onto exposed areas of the glass.
While waiting for the etching to set, I started working on the lid.
Add a dollop of glue to the bottom of the wood knob, place it in the center of the flat lid, and set aside to dry.
When the glue was completely dry, I spray-painted it white.
But the spray paint would not stick to the wooden knob so instead, I got out some white acrylic paint and painted it with a trusty old paintbrush.
After the etching cream had sat for 20 minutes it was time to wash it off with water and remove the vinyl stencil. Look how pretty!
I used E6000 Glue to adhere the pint jar to the glass candlestick.
This took about 24 hours to dry completely.
The next day, I tied a little pink ribbon around the mouth of the jar.
Lastly, I filled it with her favorite chocolate treat.
The next day at work while she was away from her desk, I snuck it over and quickly walked away.
Since I sit really close to her I was able to see her reaction when she found it. It was a hit!
Now, it has been almost a month and it still sitting on her desk and I have seen it filled with at least 3 different candies!
I am so glad she liked her special gift.
Materials Needed
- Colored cardstock or patterned paper
- Craft scissors or paper cutter
- Double-sided tape or glue stick
- Ruler and pencil
- Decorative elements (ribbons, stickers, washi tape)
- Cutting mat
- Scoring tool or bone folder
- Embellishments (buttons, sequins, stamps)
Step-by-Step Instructions
Prepare Your Materials
Gather all the required materials and tools. Make sure you have everything listed in the materials section before starting.
Set Up Your Workspace
Find a clean, well-lit area to work. Cover your surface with newspaper or a craft mat to protect it.
Follow the Main Steps
Carefully follow the instructions step by step. Take your time and don't rush through any part of the process.
Add Personal Touches
Once you've completed the basic project, feel free to add your own creative touches and personalization.
Final Assembly
Put all the pieces together according to the instructions. Double-check that everything is secure and properly attached.
Pro Tips
💡 Tip: Take your time and enjoy the creative process
💡 Tip: Don't be afraid to experiment with different colors or materials
💡 Tip: If you make a mistake, don't worry - it's all part of learning
💡 Tip: Share your finished project with friends and family
💡 Tip: Take photos of your progress to document your crafting journey
You Might Also Like

References & Further Reading
Explore these trusted resources to deepen your crafting knowledge and find more inspiration for your next project.
- Do It Yourself — Wikipedia Overview of DIY culture, history, and common techniques across woodworking, home improvement, and crafting.
- Handicraft — Wikipedia Background on traditional handicrafts, materials, and the cultural significance of handmade goods.
- Instructables Community-driven DIY project library with step-by-step photos, videos, and printable instructions.
- Woodworking — Wikipedia Techniques, tools, joinery methods, and the history of working with wood as a craft.
- Sewing — Wikipedia History and modern practice of sewing, including stitches, equipment, and fabric choices.
- Bob Vila Trusted home improvement, tool reviews, and illustrated how-to guides from a household name.
- Papercraft — Wikipedia Art forms that use paper as the primary medium, from origami to paper-mache.
- Michaels — Project Ideas Project walkthroughs, material lists, and weekly craft ideas from a major arts & crafts retailer.