DIY Aesthetic Stickers Diamond Painting Kit
Project Overview
This post is sponsored by ArtDot. All opinions expressed are my own
Sparkle up your space with ArtDot's DIY Diamond Painting Aesthetic Stickers Kit. Perfect for personalizing laptops, home decor & more. Fun for all ages!
Diamond painting has become my new favorite hobby.
It reminds me of cross-stitching with an element of paint by number.
If you've been considering dabbling in this sparkling world, there's no better way to start than with theDiamond Art Freestyle Sticker Kitfrom ArtDot.
This kit promises an engaging and satisfying experience, where you can create dazzling stickers to personalize your notebooks, laptops, home decor, and more.
Whether you're a beginner or a seasoned artist, this kit ensures fun crafting for all ages.
The Diamond Art Freestyle Sticker Kit is priced at only$19.99and makes a great gift!
Plus, if you use thecoupon code: craftyyou'll get 10% off your order. Purchase over $25 and you'll also get free shipping.
Inside the box, you'll receive:
The instructions on how to create your diamond art stickers are on the back of the box.
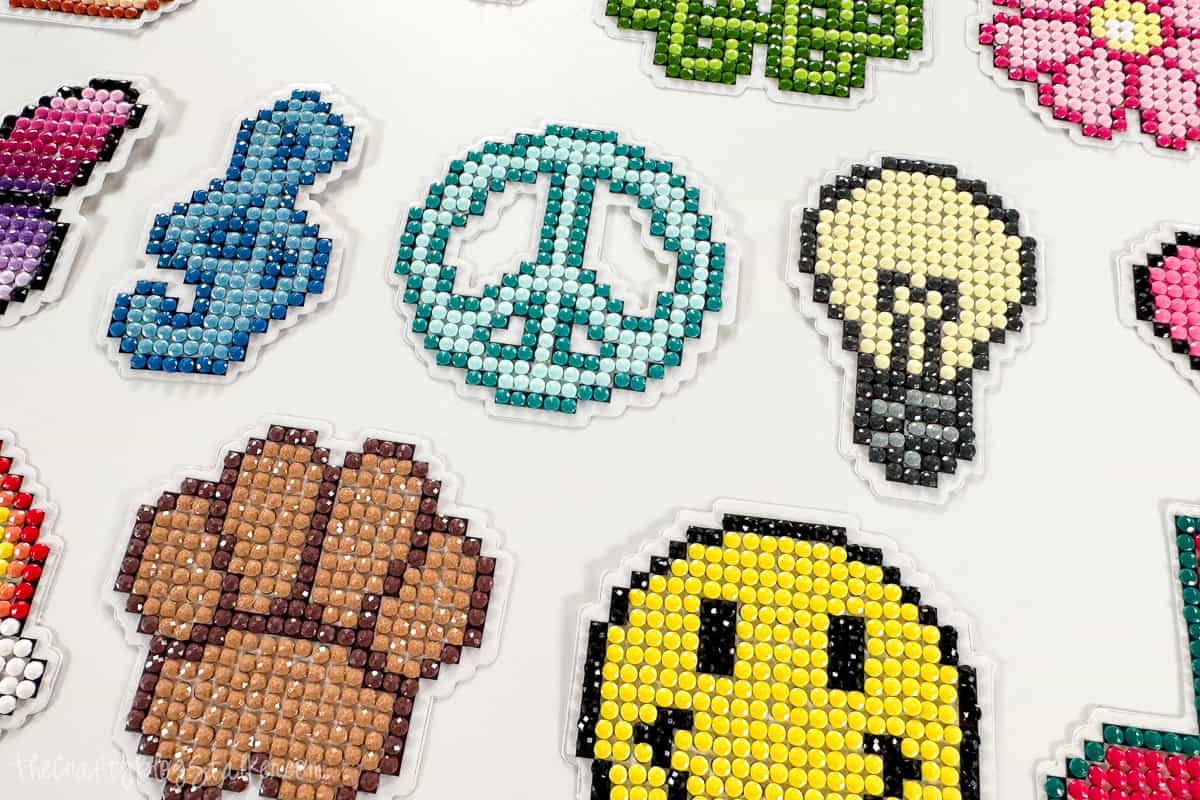
The reason this is called a freestyle kit is that there are no set colors to apply to the different stickers. You can do whatever you want!
In the second image on the instruction you can see different icons like A for a dark color, or C for white, but these are only suggestions.
And since the kit comes with 48 different colors you have lots to choose from!
For the first sticker let's do the Smiley face emoji.
Peel back the protective film off of the top of the sticker. Underneath is a sticky layer that the plastic diamonds will stick to.
I am going to go more traditional with this sticker, with a yellow face and black outline.
To start, cut open the yellow packet of diamond drills and pour some onto the tray.
Remove the top protective sheet of the wax and press the pen into the wax. The wax is what will hold the diamond drills onto the pen so you can place them on the sticker.
You can use either side of the pen. One side holds one diamond at a time.
The other side of the pen holds 3 at a time.
I personally prefer to use the single side of the tool, but you can use whichever side you prefer.
Simply place those round diamond drills on top of each little icon on the sticker.
When your pen stops picking up the diamonds, simply reinsert it into the wax and then it should resume picking up.
Once the yellow was all filled in, I moved on to the black outline.
This is how my smiley face looks completely finished. Isn't he cute?
For the next sticker, I wanted to create an ombre effect.
Since the diamond drills come packaged in a row of light to dark that was really easy!
And here is the finished butterfly!
I had so much fun, that I just kept creating more and more stickers!
I loved that I could color them however I wanted!
The kit does not include a diamond art sealer and in some instances, you might not even need it.
The sealer I used is calledLANBEIDE Diamond Painting Sealer. The bottle comes with an application sponge and you just wipe over the top of the stickers.
Then let them dry completely.
The sealer dries completely clear and they still have all of their sparkle!
Now you can adhere the sticker just like you would any other sticker!
Remove the backing paper.
Then place the sticker where you want it! In my case, it's on a photo frame.
Isn't that cute? I love how the sticker itself is clear so that those diamond dots really pop!
There are so many places you can put diamond art stickers, and here are a few ideas.
Here are a few places I chose to put my stickers.
I get asked quite a bit about how I store and organize my leftover diamond drills.
My favorite storage solution is myStackable Diamond Painting Storage.
It holds 315 containers to organize and store all of my diamond drills.
On the front of the package, where it says ARTDOT - 307, 307 is the color's number.
I haveDiamond Drill Labelsthat I can put on top of the individual container, and no matter what kit I use, number 307 will be the same color.
This is a great system and doesn't take up very much space at all.
If you are just getting started and don't need this large of a system, you can begin by purchasing only 2 drawers and purchase more as needed.
If you have any questions, don't hesitate to reach out. I'm happy to help!
Materials Needed
- Colored cardstock or patterned paper
- Craft scissors or paper cutter
- Double-sided tape or glue stick
- Ruler and pencil
- Decorative elements (ribbons, stickers, washi tape)
- Cutting mat
- Scoring tool or bone folder
- Embellishments (buttons, sequins, stamps)
Step-by-Step Instructions
Prepare Your Materials
Gather all the required materials and tools. Make sure you have everything listed in the materials section before starting.
Set Up Your Workspace
Find a clean, well-lit area to work. Cover your surface with newspaper or a craft mat to protect it.
Follow the Main Steps
Carefully follow the instructions step by step. Take your time and don't rush through any part of the process.
Add Personal Touches
Once you've completed the basic project, feel free to add your own creative touches and personalization.
Final Assembly
Put all the pieces together according to the instructions. Double-check that everything is secure and properly attached.
Pro Tips
💡 Tip: Take your time and enjoy the creative process
💡 Tip: Don't be afraid to experiment with different colors or materials
💡 Tip: If you make a mistake, don't worry - it's all part of learning
💡 Tip: Share your finished project with friends and family
💡 Tip: Take photos of your progress to document your crafting journey
You Might Also Like
References & Further Reading
Explore these trusted resources to deepen your crafting knowledge and find more inspiration for your next project.
- Do It Yourself — Wikipedia Overview of DIY culture, history, and common techniques across woodworking, home improvement, and crafting.
- Handicraft — Wikipedia Background on traditional handicrafts, materials, and the cultural significance of handmade goods.
- Instructables Community-driven DIY project library with step-by-step photos, videos, and printable instructions.
- Woodworking — Wikipedia Techniques, tools, joinery methods, and the history of working with wood as a craft.
- Sewing — Wikipedia History and modern practice of sewing, including stitches, equipment, and fabric choices.
- Bob Vila Trusted home improvement, tool reviews, and illustrated how-to guides from a household name.
- Papercraft — Wikipedia Art forms that use paper as the primary medium, from origami to paper-mache.
- Michaels — Project Ideas Project walkthroughs, material lists, and weekly craft ideas from a major arts & crafts retailer.