Make the Stapler in Jello Prank
Project Overview
Learn the classic office prank! Follow our step-by-step guide to prank your coworker by putting a stapler in jello. Hilarious and easy!
Looking to inject some humor into your workplace? Look no further!
Office fans will all remember when Jim put Dwight's stapler in jello, and he got so upset!
In this tutorial, we'll guide you through a classic office prank that's sure to leave your coworkers laughing (and perhaps a little perplexed).
Get ready to pull off the iconic "stapler in jello" prank!
If videos are your thing, you're in luck-I've got a full tutorial ready for you!
Subscribe to my YouTube channeland stay inspired with every new project.
Some links may direct you to similar items when the exact item is not available online.
You will need a bowl that is big enough for the stapler to fit inside without touching the edge. I found that the 2.5qt glass bowl worked perfectly.
This will ruin your stapler, so make sure to use an extra or one that doesn't work very well.
Cut off two long strips of dental floss about 2.5 feet long. You want to have more than you need.
Drape the lengths of dental floss over the top of the bowl.
Tape the dental floss to the bowl on only one side.
The purpose of the dental floss is to suspend the stapler and not let it sink to the bottom.
Place the stapler on top of the dental floss and pull on the floss to find the right tension.
You don't want the stapler touching any sides of the bowl, and you want it sticking higher than the rim of the bowl.
After finding the right tension, tape the dental floss to the side of the bowl.
I used 2 boxes of Lemon 6-ounce Jell-o mix. Since I am using a 2-quart glass bowl I needed about 2 quarts of jello.
Make the jello according to the package directions in a large bowl.
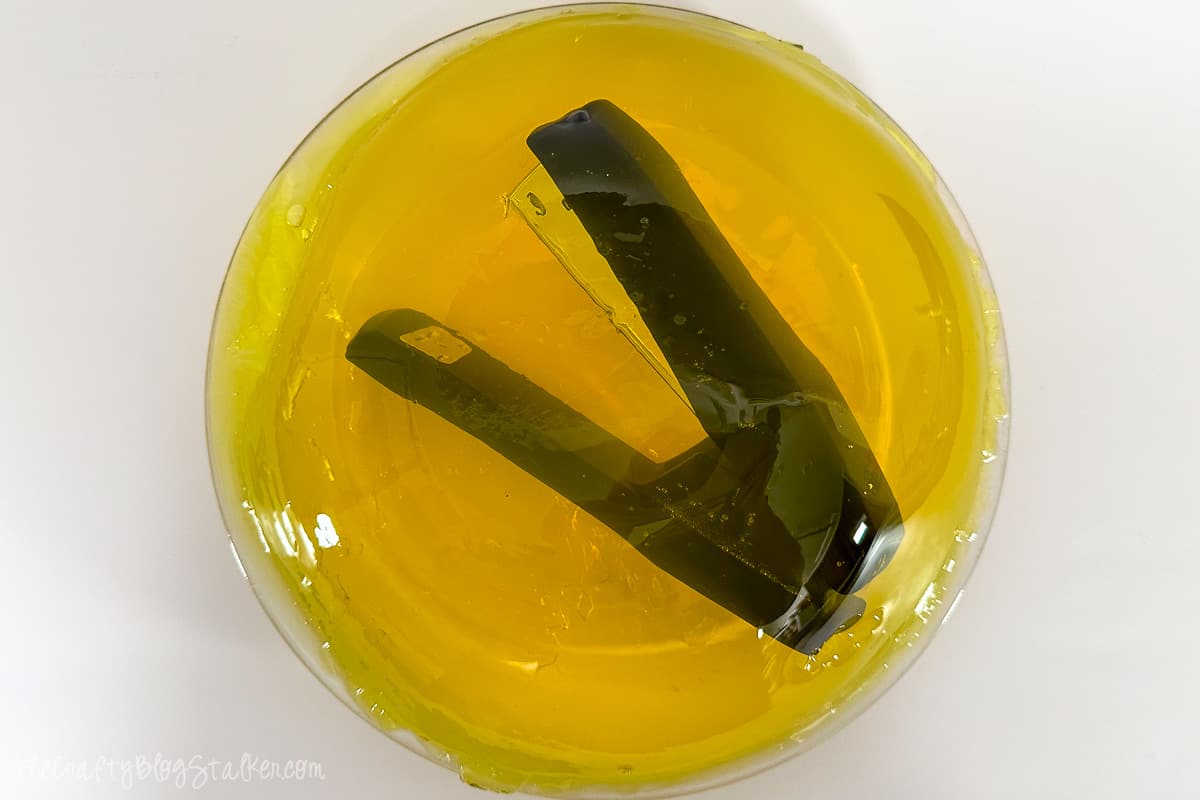
Slowly pour the jello into the bowl with the stapler.
At first, my stapler wanted to float because there was some air trapped inside. I carefully held it under for a moment to fill those air pockets.
There was still a small section that wanted to float, so I added a small magnet to that part, and it worked perfectly.
I did a final adjustment with the stapler making sure it wasn't touching the sides of the bowl and placed the bowl in the refrigerator.
The box says to refrigerate for 4 hours, but since we doubled it, the jello actually took overnight to set completely.
Pulling the bowl out of the fridge is so satisfying, It jiggles so delightfully!
Now we can remove the dental floss supports.
With a pair of scissors cut each side of the floss just above the tape.
Grab one side of the floss and slowly pull. The floss doesn't leave any tracks as it is removed. It is very cool to watch!
Remove both of the lengths of dental floss.
Before we plate the jello, place the bowl in the sink filled with warm water. You want the water to go up to the rim, but not over the rim.
Let it sit for one to two minutes.
Pull the bowl out of the water bath.
Place a plate on top. Any plate will work it just needs to be larger than the top of the bowl.
Quickly but not aggressively, flip the bowl and plate.
The jello should slip right out.
It looks so good! If you need you can put the plate of jello back in the fridge to refirm the gelatin.
While I was making this, I could not stop laughing.
This prank is perfect for April Fool's Day or any time you want to have a laugh!
This tutorial also works to suspend any type of item in Jello.
I have also suspended a mouse for my coworker and it was hilarious!!
Materials Needed
- Basic craft supplies
- Scissors or cutting tools
- Adhesive (glue, tape)
- Measuring tools
- Decorative elements
- Protective workspace covering
- Storage containers
- Cleaning supplies
Step-by-Step Instructions
Prepare Your Materials
Gather all the required materials and tools. Make sure you have everything listed in the materials section before starting.
Set Up Your Workspace
Find a clean, well-lit area to work. Cover your surface with newspaper or a craft mat to protect it.
Follow the Main Steps
Carefully follow the instructions step by step. Take your time and don't rush through any part of the process.
Add Personal Touches
Once you've completed the basic project, feel free to add your own creative touches and personalization.
Final Assembly
Put all the pieces together according to the instructions. Double-check that everything is secure and properly attached.
Pro Tips
💡 Tip: Take your time and enjoy the creative process
💡 Tip: Don't be afraid to experiment with different colors or materials
💡 Tip: If you make a mistake, don't worry - it's all part of learning
💡 Tip: Share your finished project with friends and family
💡 Tip: Take photos of your progress to document your crafting journey
You Might Also Like


References & Further Reading
Explore these trusted resources to deepen your crafting knowledge and find more inspiration for your next project.
- Do It Yourself — Wikipedia Overview of DIY culture, history, and common techniques across woodworking, home improvement, and crafting.
- Handicraft — Wikipedia Background on traditional handicrafts, materials, and the cultural significance of handmade goods.
- Instructables Community-driven DIY project library with step-by-step photos, videos, and printable instructions.
- Woodworking — Wikipedia Techniques, tools, joinery methods, and the history of working with wood as a craft.
- Sewing — Wikipedia History and modern practice of sewing, including stitches, equipment, and fabric choices.
- Bob Vila Trusted home improvement, tool reviews, and illustrated how-to guides from a household name.
- Papercraft — Wikipedia Art forms that use paper as the primary medium, from origami to paper-mache.
- Michaels — Project Ideas Project walkthroughs, material lists, and weekly craft ideas from a major arts & crafts retailer.