Easy DIY Wood Arrows for Home Decor
Project Overview
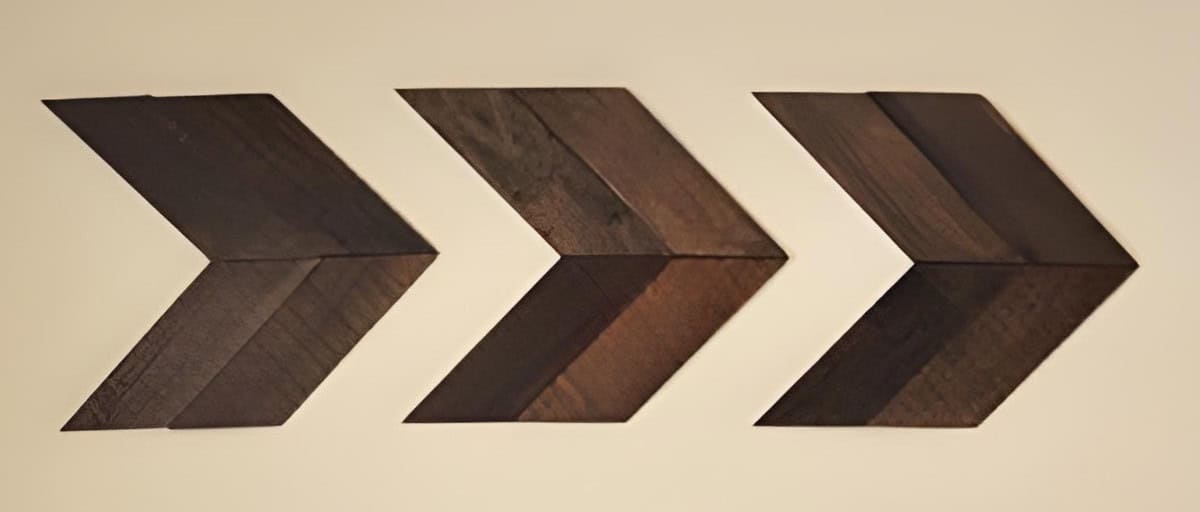
Learn how to make DIY wood arrow decor perfect for nurseries, gallery walls, or any space with a little rustic charm and personality.
I'm so excited to share this project-it might be my favorite DIY yet!
I made these wood arrows for Adam's vintage travel-themed nursery, which was even better than I imagined.
They're surprisingly easy to make, even if you've never used a saw.
It's the perfect beginner project to practice 45-degree angles and add a custom touch to any room.
Drying Time:1 hour
ActiveTime: 20 minutes
Total Time:1 hour 20 minutes
First, you need to know how big and long you want your arrow wall decor.
I used some craft wood I found at Home Depot that was 24" long and a little thinner than a 1x4, but you can just as easily use 1x4s or scrap wood.
Since my wood was 24 inches long, I found the center and cut it in half.
Find the center both horizontally and vertically, and mark it. Then center your 45-degree angle on that mark.
I used two 24-inch boards per arrow, for a total of six 24-inch boards.
The picture below shows where I made my marks to take advantage of the entire board.
Place the board in your miter saw (set to a 45-degree angle) and make the cuts. Cut as many arrows as you need.
Once you've done this, you can lay it out as shown below.
Once you are done cutting, go ahead and stain or paint the wood to your desired color.
If you'd like, I have a recipe forhomemade wood stain, but I used Minwax Dark Walnut for this project.
I applied the stain with a lint-free cloth. Since they are hanging on the wall, I chose not to seal mine, as I wanted them to have a dull finish (no shine).
But that is just personal preference. Some might argue that it must be sealed, but I'm not worried since nobody will touch them.
After the stain has completely dried, begin assembling the wooden arrows.
Add mending plates to the back of the arrows to keep your wood together.
You can also use wood glue before using the mending plates to give it that extra strength, but just the mending plates worked for me.
I then found the center of the entire arrow (for weight purposes) and added a saw tooth picture hanger to hang on the wall.
That is all there is to it! Now you can sit back and enjoy your new beautiful wall arrows!
This DIY home decor came together so quickly, the longest part was waiting for the stain to dry!
My favorite feature of this project is that it is so easy to customize. You can easily make it bigger or smaller, and stain whatever color fits your style!
Where will you put yours? I think I want some in my living room now!
Adam's nursery is finally finished! Here are some other projects I have completed for his room.
Hi, I'm Katie!
I'm so glad you're here. Want to make something fabulous? I'm here to help!
Materials Needed
- Fresh ingredients (vegetables, meats, herbs)
- Cooking oil or butter
- Salt and pepper
- Mixing bowls
- Cutting board and knife
- Measuring cups and spoons
- Cooking utensils (spatula, wooden spoon)
- Baking sheet or cooking pan
Step-by-Step Instructions
Prepare Your Materials
Gather all the required materials and tools. Make sure you have everything listed in the materials section before starting.
Set Up Your Workspace
Find a clean, well-lit area to work. Cover your surface with newspaper or a craft mat to protect it.
Follow the Main Steps
Carefully follow the instructions step by step. Take your time and don't rush through any part of the process.
Add Personal Touches
Once you've completed the basic project, feel free to add your own creative touches and personalization.
Final Assembly
Put all the pieces together according to the instructions. Double-check that everything is secure and properly attached.
Pro Tips
💡 Tip: Take your time and enjoy the creative process
💡 Tip: Don't be afraid to experiment with different colors or materials
💡 Tip: If you make a mistake, don't worry - it's all part of learning
💡 Tip: Share your finished project with friends and family
💡 Tip: Take photos of your progress to document your crafting journey
You Might Also Like


References & Further Reading
Explore these trusted resources to deepen your crafting knowledge and find more inspiration for your next project.
- Do It Yourself — Wikipedia Overview of DIY culture, history, and common techniques across woodworking, home improvement, and crafting.
- Handicraft — Wikipedia Background on traditional handicrafts, materials, and the cultural significance of handmade goods.
- Instructables Community-driven DIY project library with step-by-step photos, videos, and printable instructions.
- Woodworking — Wikipedia Techniques, tools, joinery methods, and the history of working with wood as a craft.
- Sewing — Wikipedia History and modern practice of sewing, including stitches, equipment, and fabric choices.
- Bob Vila Trusted home improvement, tool reviews, and illustrated how-to guides from a household name.
- Papercraft — Wikipedia Art forms that use paper as the primary medium, from origami to paper-mache.
- Michaels — Project Ideas Project walkthroughs, material lists, and weekly craft ideas from a major arts & crafts retailer.