The Most Efficient Way to Clean a House with Free Printable
Project Overview
This post is sponsored by Hoover. All opinions expressed are my own.
The most efficient way to clean a house starts with a solid plan! Grab this free printable and follow our cleaning tips to make your home shine.
I'm unsure who invented Spring Cleaning, but the timing makes perfect sense.
After being stuck in the house all winter, I'm always in the mood to get it spotless as the sun peeks out of those dreary clouds.
These tips aren't just for Spring. This is an excellent resource for efficiently cleaning your house whenever you need a deep cleaning!
There are typically two ways people clean whole houses: room-by-room and task cleaning (not room-specific).
I've tried both ways, but ultimately, combining the two works best for me.
This is more of a process when cleaning your whole house vs. doing daily maintenance.
I've created a free printable to help you clean each room individually, checking it off as you go. That's my favorite part!
Starting at the top is important because dirt can fall to the floor as we dust and clean the higher-up areas.
You'll dirty up your hard work if you clean your floor before dusting.
I start with myHoover Cordless Vacuumutilizing the attachments to dust up high on window trim, door frames, etc.
You can use this for any flat surface that collects dust as well.
I like to do this all over the house at once, while I have the vacuum out.
After dusting high spaces, this is where I start working room to room.
Start by picking up things that are out of place and need to be thrown away.
For example, if I find things that need to go in my bedroom, I simply move them to my bedroom without putting them exactly where they go.
If I fill my time organizing every item, I get distracted and never actually accomplish a task.
So I'll move them to the correct space and organize them when I move into those rooms.
Now, it's time to move down to the mid-level areas of your home, such as the windows and shelves.
Start by dusting and wiping down surfaces as necessary.
I also take this opportunity to clean mirrors, faucets, toilets, and anything else we use and touch regularly.
Next up is vacuuming.
I use myONEPWR Max Cordless Vacuumand some attachments to clean stairs, crevices, baseboards (top and bottom), and hard floors. Don't forget the rugs!
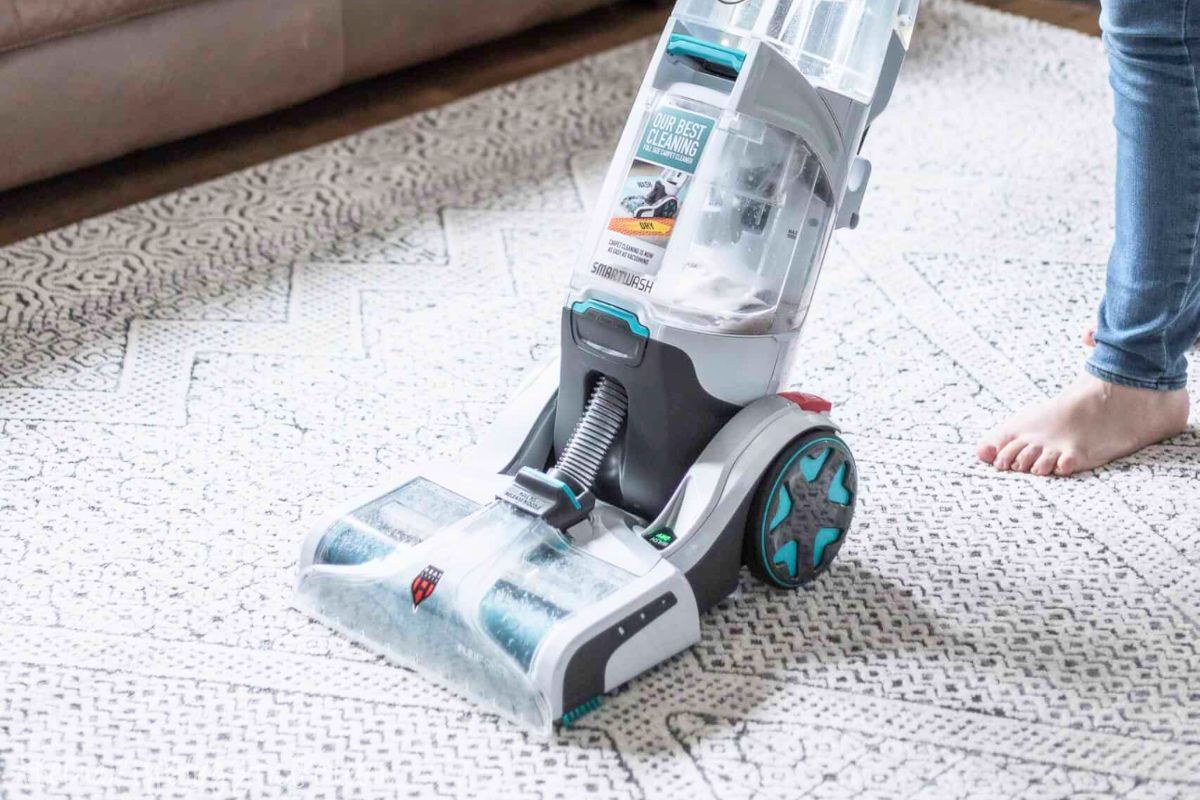
When moving to carpet, I suggest using theHoover Upright Vacuumfor a deep clean.
Stick Vacuums are great for in between and on hard floors, but I prefer a full-size vacuum for carpeting whendeep cleaning.
It's incredible how much dirt comes from rugs and carpets when using a carpet cleaner.
These vacuums remove that embedded dirt and make your whole house feel fresh!
I suggest doing this for spills and then every 3-4 months depending on your lifestyle.
However, theHoover Smartwash Automatic Carpet Cleaneris so easy to use that if you have pets or live in a dusty climate, it's no big deal to pull it out as much as necessary to maintain a clean floor!
If you're like me and have hard floors, Hoover also makes a greatHard Floor Cleaner.
This is definitely my go-to when wrapping up all my house cleaning!
That's how I tackle my house. It may not be for everyone, so feel free to change it to whatever you think is best.
If you want to keep up with the house cleaning during the summer, I have aKids Summer Chore Chartthat you can print off.
What's your biggest cleaning challenge? Comment below!
Materials Needed
- Basic craft supplies
- Scissors or cutting tools
- Adhesive (glue, tape)
- Measuring tools
- Decorative elements
- Protective workspace covering
- Storage containers
- Cleaning supplies
Step-by-Step Instructions
Prepare Your Materials
Gather all the required materials and tools. Make sure you have everything listed in the materials section before starting.
Set Up Your Workspace
Find a clean, well-lit area to work. Cover your surface with newspaper or a craft mat to protect it.
Follow the Main Steps
Carefully follow the instructions step by step. Take your time and don't rush through any part of the process.
Add Personal Touches
Once you've completed the basic project, feel free to add your own creative touches and personalization.
Final Assembly
Put all the pieces together according to the instructions. Double-check that everything is secure and properly attached.
Pro Tips
💡 Tip: Take your time and enjoy the creative process
💡 Tip: Don't be afraid to experiment with different colors or materials
💡 Tip: If you make a mistake, don't worry - it's all part of learning
💡 Tip: Share your finished project with friends and family
💡 Tip: Take photos of your progress to document your crafting journey
You Might Also Like
References & Further Reading
Explore these trusted resources to deepen your crafting knowledge and find more inspiration for your next project.
- Do It Yourself — Wikipedia Overview of DIY culture, history, and common techniques across woodworking, home improvement, and crafting.
- Handicraft — Wikipedia Background on traditional handicrafts, materials, and the cultural significance of handmade goods.
- Instructables Community-driven DIY project library with step-by-step photos, videos, and printable instructions.
- Woodworking — Wikipedia Techniques, tools, joinery methods, and the history of working with wood as a craft.
- Sewing — Wikipedia History and modern practice of sewing, including stitches, equipment, and fabric choices.
- Bob Vila Trusted home improvement, tool reviews, and illustrated how-to guides from a household name.
- Papercraft — Wikipedia Art forms that use paper as the primary medium, from origami to paper-mache.
- Michaels — Project Ideas Project walkthroughs, material lists, and weekly craft ideas from a major arts & crafts retailer.