Budget Friendly DIY Crafting Table with Kallax IKEA
Project Overview
Create the ultimate DIY crafting table with IKEA Kallax shelves. They are affordable, stylish, and packed with storage to organize your creative space.
Is your craft your escape too? My craft room is my favorite spot in the house!
It's where I spend hours creating projects and writing tutorials to share with you.
Since I spend so much time there, I needed a table that was both functional and, of course, pretty!
This was my craft room after doing majorcleaning and organizing(which I shared in my craft room post).
The room was better, but it still seemed cluttered. Those folding tables are just ugly!
So, I decided to build a budget-friendly crafting table using IKEA Kallax shelves. It has plenty of storage and is the perfect setup for all my creative chaos!
I had been buying this craft table fromIkeaHackers.netfor a long time.
Over Christmas break, my husband asked me what I wanted for my Birthday (December 30th), and I went straight to this table and said, "This."
Later that day, we were at Ikea, and before I knew it, 3 Kallax boxes were on our cart. Yay!
Some links may direct you to similar items when the exact item is not available online.
Assembling the shelves is really pretty straightforward. That is one of the reasons I love Ikea, they make their assembly simple.
After the three shelves were all built, we measured them to know exactly how big we wanted the top to be.
We decided on 32 x 72 inches. This made the top just a little bit bigger, so there would be a slight overhang, and we wouldn't have to worry about being perfect.
We went to Lowe's to pick out the board and decided on Oak. Vern was invaluable and even cut the board to the size we needed. I love that they do that!
For the stain, I decided onEnglish Chestnutby Minwax. For the polyurethane sealer, I chose theFast-Drying Clear Semi-Glossby Minwax.
Once home, we laid the board on top of the Kallax units, and it was a perfect fit. Whew, that was scary. ÄŸËâ?/p>
Then, I began sanding. It was a good piece of wood, so it didn't need much prep work.
I applied 2 coats of stain and 2 coats of sealer.
The hardest part was waiting for it to dry between each coat. I was so excited about my table that I wanted it done!
When the tabletop was FINALLY dry, we started putting it all together.
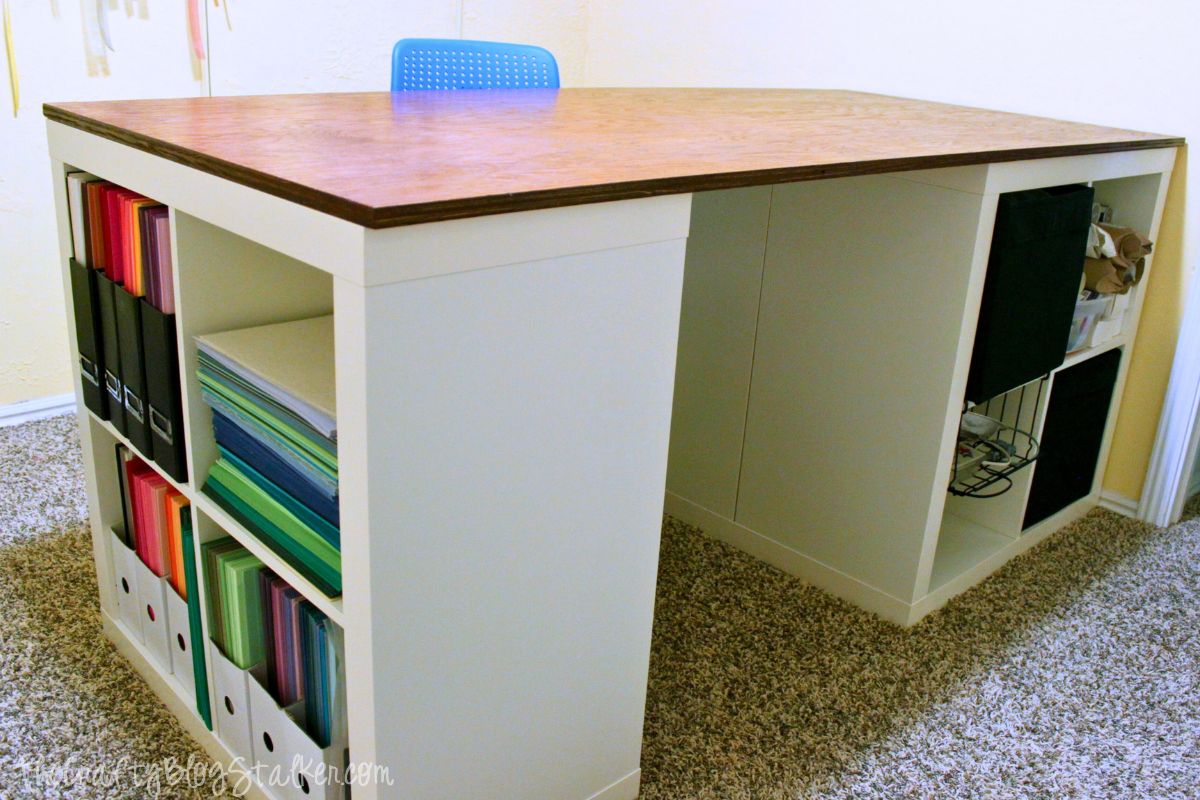
We used 2 flat brackets to secure the 2 Kallax units to each other and used 4 L brackets to secure the top to the units.
The top was pretty secure, but we wanted to ensure it wouldn't move.
We took 4, 2 ½ screws and screwed up through the top of the shelf into the bottom of the table in the 4 corners.
I love my new DIY craft table; just look at all that storage!
This table gives me 12 square cubby holes to store paper, vinyl, and more. Just look at how pretty that paper organization is. ââ¢Â¥Ã¯Â?/p>
Even though this is a large craft table, my room is not cluttered, and I can walk around it. I love it!
The finished height of my table is almost 32 inches.
The average counter height is 34-36 inches, so it's a tad shorter. If you want it taller, you could add someSwivel Castor Wheels.
Do you want to keep building? Here are a few more fun ideas.
Materials Needed
- Colored cardstock or patterned paper
- Craft scissors or paper cutter
- Double-sided tape or glue stick
- Ruler and pencil
- Decorative elements (ribbons, stickers, washi tape)
- Cutting mat
- Scoring tool or bone folder
- Embellishments (buttons, sequins, stamps)
Step-by-Step Instructions
Prepare Your Materials
Gather all the required materials and tools. Make sure you have everything listed in the materials section before starting.
Set Up Your Workspace
Find a clean, well-lit area to work. Cover your surface with newspaper or a craft mat to protect it.
Follow the Main Steps
Carefully follow the instructions step by step. Take your time and don't rush through any part of the process.
Add Personal Touches
Once you've completed the basic project, feel free to add your own creative touches and personalization.
Final Assembly
Put all the pieces together according to the instructions. Double-check that everything is secure and properly attached.
Pro Tips
💡 Tip: Take your time and enjoy the creative process
💡 Tip: Don't be afraid to experiment with different colors or materials
💡 Tip: If you make a mistake, don't worry - it's all part of learning
💡 Tip: Share your finished project with friends and family
💡 Tip: Take photos of your progress to document your crafting journey
You Might Also Like


References & Further Reading
Explore these trusted resources to deepen your crafting knowledge and find more inspiration for your next project.
- Do It Yourself — Wikipedia Overview of DIY culture, history, and common techniques across woodworking, home improvement, and crafting.
- Handicraft — Wikipedia Background on traditional handicrafts, materials, and the cultural significance of handmade goods.
- Instructables Community-driven DIY project library with step-by-step photos, videos, and printable instructions.
- Woodworking — Wikipedia Techniques, tools, joinery methods, and the history of working with wood as a craft.
- Sewing — Wikipedia History and modern practice of sewing, including stitches, equipment, and fabric choices.
- Bob Vila Trusted home improvement, tool reviews, and illustrated how-to guides from a household name.
- Papercraft — Wikipedia Art forms that use paper as the primary medium, from origami to paper-mache.
- Michaels — Project Ideas Project walkthroughs, material lists, and weekly craft ideas from a major arts & crafts retailer.