Modern Rustic Master Bedroom Reveal
Project Overview
See how modern and rustic styles combine in this dreamy master bedroom-a cozy, stylish space you'll want to copy.
My bedroom has always been the most overlooked room in the house.
It's been the dumping ground for laundry, toys, kids, and any other little random thing the family doesn't know what to deal with.
That all changes today! I will share my new and improved Master Bedroom, which I designed with a rustic theme.
If you follow me onFacebookandInstagram, you have probably already seen a few sneak peeks.
I asked all my Facebook followers how to hide my off-center window and gave two options: curtains or a fake wall.
Of course, everyone wanted to see the fake wall ; ) So, a fake wall you got!
This is to remind you of what this space looked like before...
And here's the after.
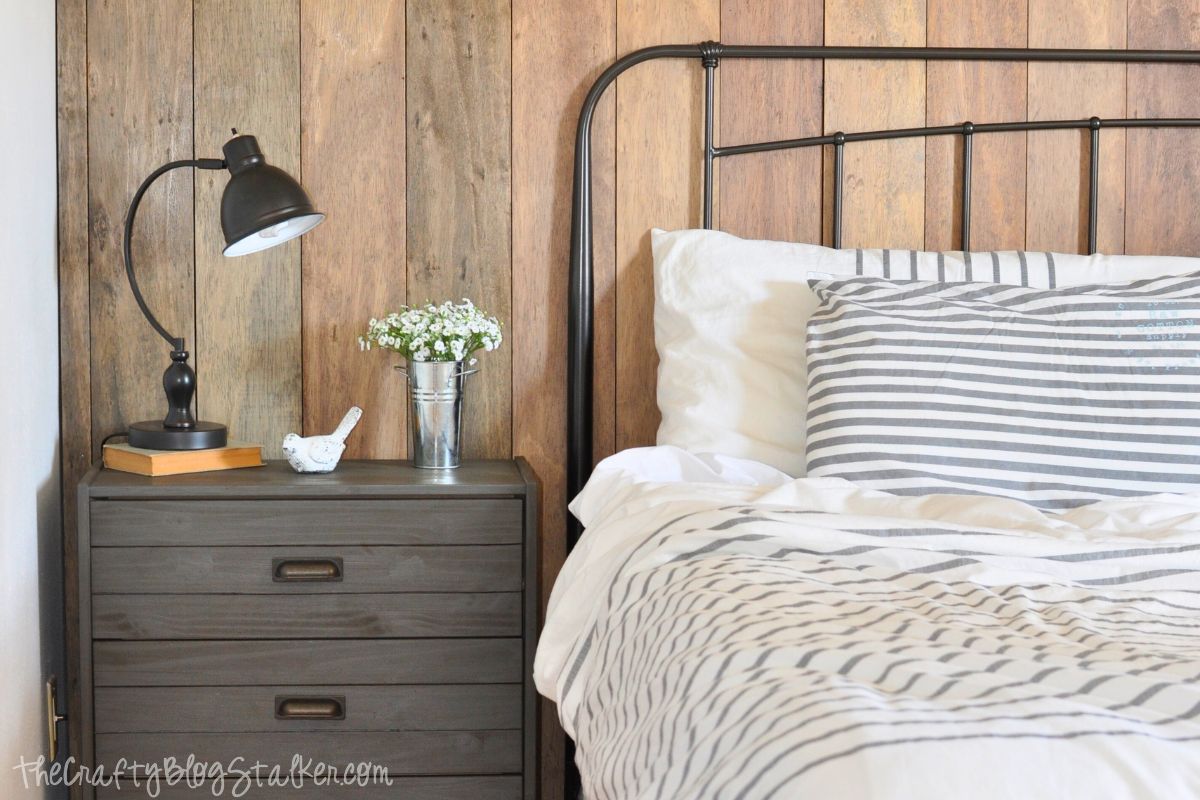
I love the texture on that faux wood wall. It brings so much warmth to this room.
I won't lie-this is one hard space to photograph!
There just doesn't seem to be a good place to stand to get the whole room in there.
So bear with me as I try to piece it together for you!
My favorite spot to stand is in the hallway as you enter the bedroom.
You can see my favorite furnishings standing in this spot.
That rug! I love this rug! My kids fight over who lies down on it; it's so soft and fuzzy!
It's theBetter Homes and Gardens Moroccan Cream Woven Area Rug. Mine is a 5x7, but it is available in several other sizes.
It goes perfectly with my Better Homes and Gardens round mirrors!
This space has become one of my favorite places to sit in the house and drink coffee.
Maybe it's because it's the only spot that's actually clean right now. ÄŸËâ?/p>
Mynightstandsare also a recent project, and I love the combination of dark gray with theselamps.
I have another Ikea hack for this room. I bought the Tarva Dresser and made a few little adjustments!
The hardware is the same as mynightstands(Hickory Hardware).
It's not a largedresser, but I was looking for something on the smaller side because I was determined to make room for a chair in mybedroom!
On top of the dresser are old books and little decorations that caught my eye as I wandered aimlessly around stores.
I always have to bring just a hint of a cottage feel to a room. It gives it that coziness I'm always searching for!
Don't skip out on small decor pieces and accessories. They really help bring a room together.
I'm not done with this room yet. Are you ever really done with a room? I'm constantly changing things around!
Some links may direct you to similar items when the exact item is not available online.
Do you have more home improvement ideas? Here are some guides to get you started!
Materials Needed
- Wood boards or planks (appropriate size)
- Sandpaper (various grits: 120, 220, 400)
- Wood glue
- Wood stain or paint
- Saw (hand saw or power saw)
- Drill and drill bits
- Measuring tape and square
- Protective finish (polyurethane or wood oil)
Step-by-Step Instructions
Prepare Your Materials
Gather all the required materials and tools. Make sure you have everything listed in the materials section before starting.
Set Up Your Workspace
Find a clean, well-lit area to work. Cover your surface with newspaper or a craft mat to protect it.
Follow the Main Steps
Carefully follow the instructions step by step. Take your time and don't rush through any part of the process.
Add Personal Touches
Once you've completed the basic project, feel free to add your own creative touches and personalization.
Final Assembly
Put all the pieces together according to the instructions. Double-check that everything is secure and properly attached.
Pro Tips
💡 Tip: Take your time and enjoy the creative process
💡 Tip: Don't be afraid to experiment with different colors or materials
💡 Tip: If you make a mistake, don't worry - it's all part of learning
💡 Tip: Share your finished project with friends and family
💡 Tip: Take photos of your progress to document your crafting journey
You Might Also Like
References & Further Reading
Explore these trusted resources to deepen your crafting knowledge and find more inspiration for your next project.
- Do It Yourself — Wikipedia Overview of DIY culture, history, and common techniques across woodworking, home improvement, and crafting.
- Handicraft — Wikipedia Background on traditional handicrafts, materials, and the cultural significance of handmade goods.
- Instructables Community-driven DIY project library with step-by-step photos, videos, and printable instructions.
- Woodworking — Wikipedia Techniques, tools, joinery methods, and the history of working with wood as a craft.
- Sewing — Wikipedia History and modern practice of sewing, including stitches, equipment, and fabric choices.
- Bob Vila Trusted home improvement, tool reviews, and illustrated how-to guides from a household name.
- Papercraft — Wikipedia Art forms that use paper as the primary medium, from origami to paper-mache.
- Michaels — Project Ideas Project walkthroughs, material lists, and weekly craft ideas from a major arts & crafts retailer.