How to Turn a Dresser into a TV Stand
Project Overview
Learn how to turn a dresser into a TV stand with this simple DIY. It's budget-friendly, functional, and adds character to your living room setup.
This project takes me way back, like to the early days of sharing tutorials when I thought crooked photos were "cool". 😣
Spoiler: the pictures aren't great, but the steps still hold up!
If you've got an old dresser collecting dust or you don't want to drop a lot of cash for a media console, this is an excellent DIY for giving furniture new life.
Estimated Cost:$30
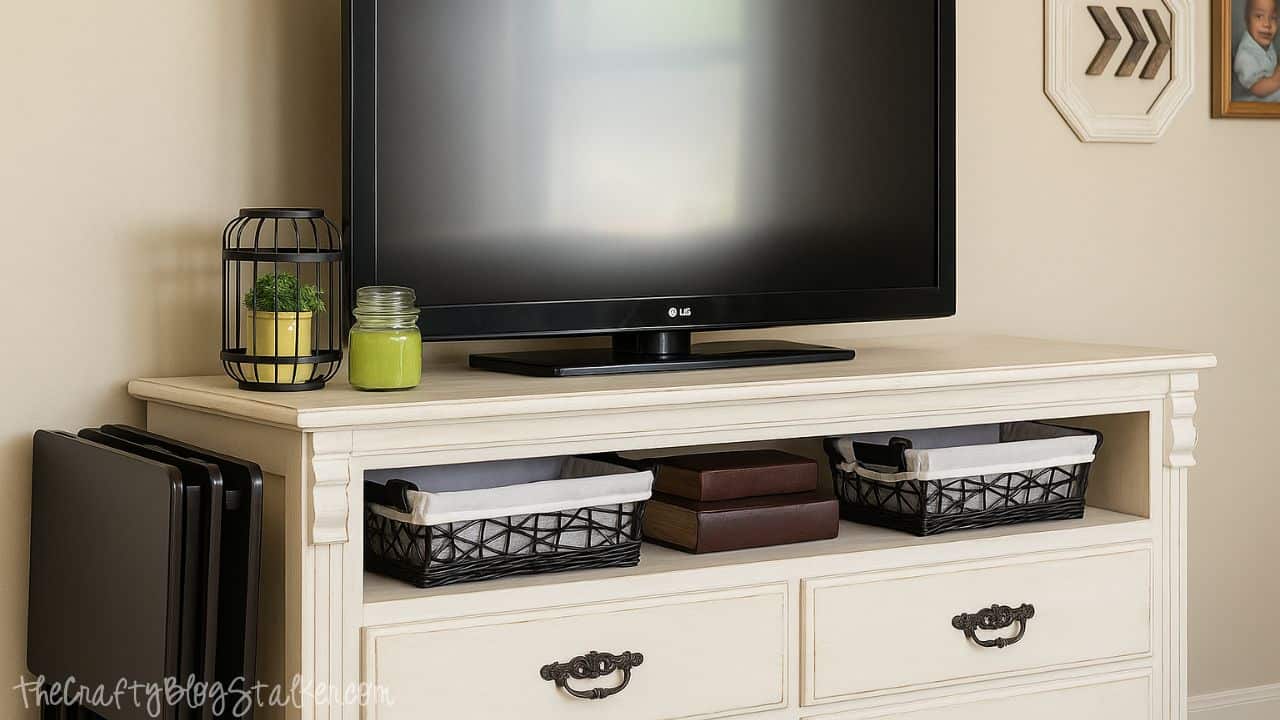
I found this dresser at a yard sale for $15. It was a bit ugly and not in the best shape, but since it was cheap, it was exactly what I was looking for.
Since this dresser is second-hand (and possibly third or fourth-hand), the first thing I did was wipe the entire dresser with bleach.
Then, I removed the top drawers and cut out the vertical brace that divided the drawers using ahacksaw. I circled where they were just in case you weren't sure what I removed.
Now there is a big open shelf for our DVD player and stereo.
I painted the whole thing withAnnie Sloan Chalk Paint. I love that stuff!
It is a bit pricey, but I would definitely recommend it because I didn't have to sand a thing!
After touch-ups here and there, I worked on the drawers and distressed the whole thing (this was the fun part)!!
I originally intended to replace the ugly handles, but after removing and cleaning them, they looked a lot better, so I kept them as they were.
I absolutely LOVE this TV stand. It has excellent storage, and it was so much cheaper than buying a new fancy one from a furniture store.
After a couple of years, I finally took a good picture of the DIY TV stand, and it was even straight. I was learning! ÄŸËâ?/p>
It is so fun to update old furniture to meet your needs. Here are a few more ideas!
Hi, I'm Katie!
I'm so glad you're here. Want to make something fabulous? I'm here to help!
Materials Needed
- Basic craft supplies
- Scissors or cutting tools
- Adhesive (glue, tape)
- Measuring tools
- Decorative elements
- Protective workspace covering
- Storage containers
- Cleaning supplies
Step-by-Step Instructions
Prepare Your Materials
Gather all the required materials and tools. Make sure you have everything listed in the materials section before starting.
Set Up Your Workspace
Find a clean, well-lit area to work. Cover your surface with newspaper or a craft mat to protect it.
Follow the Main Steps
Carefully follow the instructions step by step. Take your time and don't rush through any part of the process.
Add Personal Touches
Once you've completed the basic project, feel free to add your own creative touches and personalization.
Final Assembly
Put all the pieces together according to the instructions. Double-check that everything is secure and properly attached.
Pro Tips
💡 Tip: Take your time and enjoy the creative process
💡 Tip: Don't be afraid to experiment with different colors or materials
💡 Tip: If you make a mistake, don't worry - it's all part of learning
💡 Tip: Share your finished project with friends and family
💡 Tip: Take photos of your progress to document your crafting journey
You Might Also Like

References & Further Reading
Explore these trusted resources to deepen your crafting knowledge and find more inspiration for your next project.
- Do It Yourself — Wikipedia Overview of DIY culture, history, and common techniques across woodworking, home improvement, and crafting.
- Handicraft — Wikipedia Background on traditional handicrafts, materials, and the cultural significance of handmade goods.
- Instructables Community-driven DIY project library with step-by-step photos, videos, and printable instructions.
- Woodworking — Wikipedia Techniques, tools, joinery methods, and the history of working with wood as a craft.
- Sewing — Wikipedia History and modern practice of sewing, including stitches, equipment, and fabric choices.
- Bob Vila Trusted home improvement, tool reviews, and illustrated how-to guides from a household name.
- Papercraft — Wikipedia Art forms that use paper as the primary medium, from origami to paper-mache.
- Michaels — Project Ideas Project walkthroughs, material lists, and weekly craft ideas from a major arts & crafts retailer.