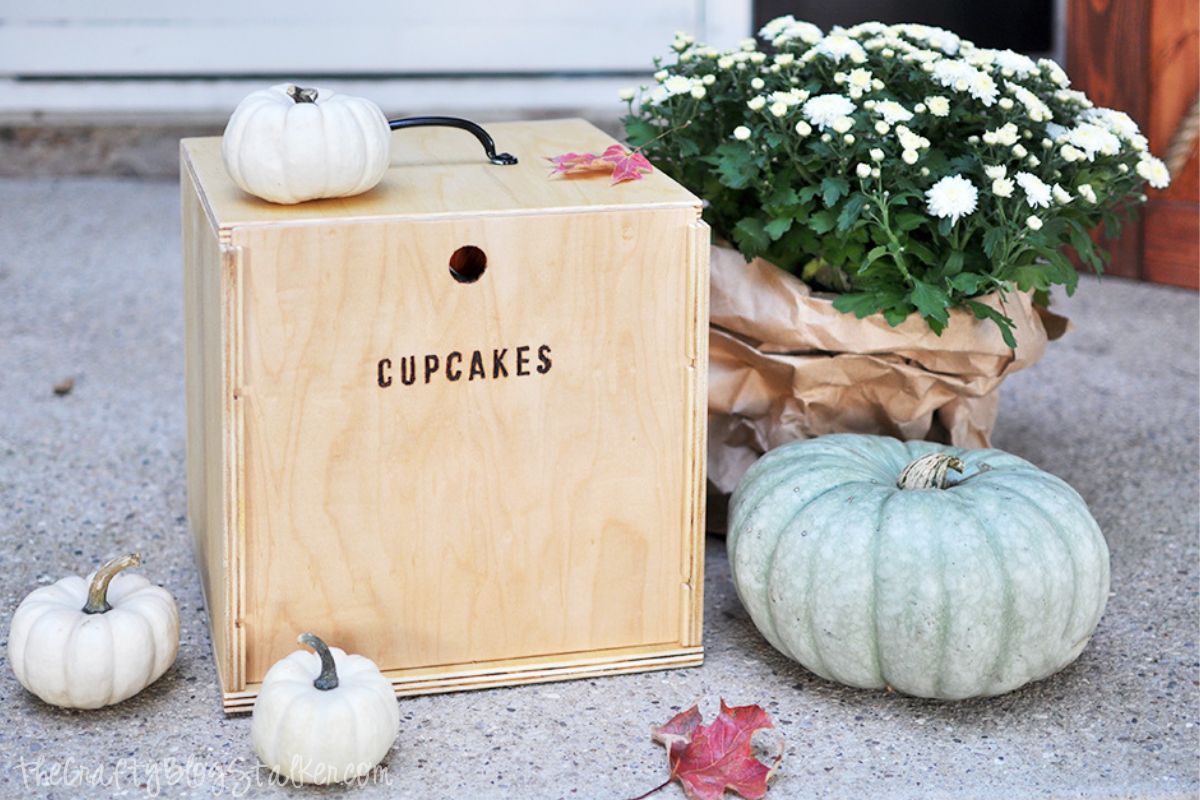
How to Make a DIY Cupcake Carrier Box
Project Overview
Ditch flimsy containers and make a DIY cupcake carrier box! This easy-to-build project keeps your cupcakes secure for parties, gifts, or bake sales.
Transporting cupcakes without them tipping over or getting smushed can be scary.
They are so pretty when they leave the house, and I want them to still be pretty when they arrive at the party!
Store-bought carriers are handy but often flimsy, expensive, or not the correct size. So why not make your own?
This DIY cupcake carrier box is a sturdy, reusable solution that keeps your sweet treats safe while on the go.
Let's get building and keep those cupcakes looking as good as they taste!
Some links may direct you to similar items when the exact item is not available online.
¼-inch Plywood
½-in Plywood
Use a router to cut a ¼" dado, or groove, along the side of the 11" x 22" board following the dimensions in the picture.
This will be for the front panel.
Cutting it as one piece eliminates the need to cut two separate grooves with the router.
Cut both of the side pieces out of the board with the dado. Each side piece should measure 11" x 10.5"
Using the router, create a ¼" groove that follows the dimensions in the picture below.
This will be for the cupcake shelves.
Drill a hole in the front panel using a 1" - 1.5" hole saw centered horizontally and about 1.5 - 2" from the top.
I also used awood-burning toolto write out the word "cupcakes." This is totally optional, but I love how it looks!
Drill holes in the cupcake trays with 2 â ? hole saw.
Start by finding the center point and then evenly spacing the remaining holes.
Attach both side pieces to the bottom piece using wood glue and finish nails
Attach the back piece to the sides and bottom using wood glue and finish nails, keeping the project square.
Attach the top using wood glue and finish nails.
Slide in the cupcake trays. You may need to sand down the edges if they are slightly off.
I would suggest using a belt or bench sander and then smoothing it with a palm sander.
Slide in the front panel.
Last, attach the handle to the top of the cupcake box.
I absolutely love my new cupcake carrier.
The most fabulous feature of this cupcake box is the pull-out trays.
They're perfect to grab a tray and dish out the cupcakes, especially if everyone is jumping out of pure cupcake excitement!
Who is ready to build their own?
Don't put those tools away yet. There are more fun things to make!
Materials Needed
- Wood boards or planks (appropriate size)
- Sandpaper (various grits: 120, 220, 400)
- Wood glue
- Wood stain or paint
- Saw (hand saw or power saw)
- Drill and drill bits
- Measuring tape and square
- Protective finish (polyurethane or wood oil)
Step-by-Step Instructions
Prepare Your Materials
Gather all the required materials and tools. Make sure you have everything listed in the materials section before starting.
Set Up Your Workspace
Find a clean, well-lit area to work. Cover your surface with newspaper or a craft mat to protect it.
Follow the Main Steps
Carefully follow the instructions step by step. Take your time and don't rush through any part of the process.
Add Personal Touches
Once you've completed the basic project, feel free to add your own creative touches and personalization.
Final Assembly
Put all the pieces together according to the instructions. Double-check that everything is secure and properly attached.
Pro Tips
💡 Tip: Take your time and enjoy the creative process
💡 Tip: Don't be afraid to experiment with different colors or materials
💡 Tip: If you make a mistake, don't worry - it's all part of learning
💡 Tip: Share your finished project with friends and family
💡 Tip: Take photos of your progress to document your crafting journey
You Might Also Like
References & Further Reading
Explore these trusted resources to deepen your crafting knowledge and find more inspiration for your next project.
- Do It Yourself — Wikipedia Overview of DIY culture, history, and common techniques across woodworking, home improvement, and crafting.
- Handicraft — Wikipedia Background on traditional handicrafts, materials, and the cultural significance of handmade goods.
- Instructables Community-driven DIY project library with step-by-step photos, videos, and printable instructions.
- Woodworking — Wikipedia Techniques, tools, joinery methods, and the history of working with wood as a craft.
- Sewing — Wikipedia History and modern practice of sewing, including stitches, equipment, and fabric choices.
- Bob Vila Trusted home improvement, tool reviews, and illustrated how-to guides from a household name.
- Papercraft — Wikipedia Art forms that use paper as the primary medium, from origami to paper-mache.
- Michaels — Project Ideas Project walkthroughs, material lists, and weekly craft ideas from a major arts & crafts retailer.